Davina Dress - Itch to Stitch

This is my second time to test a pattern for Kennis at Itch to Stitch. This is the Davina Dress. It's made for stretch knits and is intended to have a fitted bodice with a half circle skirt. It comes with many options making this a dress you can make for the heat of the summer or cool fall days. It also has the option to add pockets. Buy it Here for $9.60. Kennis is also doing a giveaway with the launch of this pattern - check out her blog post for all the details.

Since we will be entering fall soon, I decided to make my dress with 3/4 length sleeves and have pockets. The fabric I used was purchased from Wherehouse Fabrics in Dallas, Texas. This was a piece I found on the remnant table for $5/yard. For the bodice lining, I used come off white knit I already had.

Here are all my pieces cut out.


The first step was to apply a fusible bias stay tape to several pieces. I did not have fusible bias tape, so I made do with regular. Here are my pieces with the fusible tape applied.


Now I had to gather the front pieces. I marked my pieces with a disappearing ink pen.


Then sewed a long stitch between the dots to gather the fabric. I used my ruler to make sure I had them gathered to 2" in length.


Then I sewed the 2 pieces together - no serging.


Next it was time to add the waist band to the front bodice. I laid the piece on top and pinned it.


Then serged it on. I repeated this on the lining.


Now I sewed the back pieces together - these were serged.


Then I sewed the waistband to the back.


Now I serged the front to the back at the shoulders for the lining and the outer fabric separately.


Now the two pieces were pinned together (right sides together) and stitched around the neckline.


Then the neckline was under-stitched so that the lining would roll inward so it would not be seen from the outside.My neckline turned right side out.


Now the side seams of each layer were serged. Then both layers of the armholes were basted together.

The sleeves were then serged down the sides.


Then the sleeves were pinned (right sides together) to the bodice and serged.


Then the sleeves were hemmed using my coverstitch.


Outside stitch. I already had this turquoise thread on my coverstitch and decided it went well with this fabric and used it.


Here is the backside.


Now it was time to work on the skirt. First the pocket facing was sewn onto to the skirt. It was also understitched.


Then the other part of the pocket was sewn on.


Then the pocket was basted at the top and sides of the skirt.


Now the back of the skirt was serged together.


Then the skirt front is serged to the skirt back.


The raw edges of the bodice are now basted.


Now the skirt is pinned to the bodice.


Now it is serged on.


The last step is to hem the skirt. First I ironed my hem. I tried the dress on and decided to do a 1" hem. I used my ruler to make sure my hem was even.


Then I used my coverstitch to hem it.


Here I am in my Davina Dress.


I love the pockets. They are a great size and are discrete.


If you enjoyed my blog, like my facebook page.

Thanks!

A Vision to Remember - Lexi-Lou Rag Bag Pattern Test

Join seven seamstresses as we sew up the New Lexi-Lou bag from A Vision to Remember. There will be one or two bloggers each day, be sure to visit them all as no two bags are the same!
*NOTE* The links below won’t show the tour posts until their day of the tour, but you are encouraged to click through and check their blogs out.
Be sure to leave a comment each day to be entered to win a free pattern. Each blogger will be choosing one comment from their blog to receive a free pattern from A Vision to remember.
Also, the Lexi-Lou Pattern has been discounted 25% this week! Get yours now on Craftsy or Etsy!


I did a pattern test for Bobbie Stucki of A Vision to Remember. You can find her patterns on Etsy. Check out her blog at www.avisiontoremember.com

Here is a link to the pattern Lexi Lou.

I have never sewn a purse before. So this was a first for me. It was challenging, but it was fun.

The first step was cutting out all the pieces. And there are a lot of pieces. Normally I take a photo of all my pieces together, but there were too many and I was trying to keep them organized so they were on the floor in piles.

The first step was to construct the outside pockets. This involved sewing strips of fabric in a quilt as you go method onto a flannel rectangle. But you leave the edges ra - for the full rag effect in the end.


Here is the pocket with all the strips. Later I'll cut off the excess. There is one of these pockets on each side of the bag.


Then I made the inside small pocket. It was a piece of flannel sandwiched between 2 pieces of fabric. Only the top edge was sewn straight across - again leave raw edges.


Then I ironed fusible interfacing to the straps. This was the pect use of my scrap interfacing. I hate to throw any pieces away and save the scraps for pieces. They work great for things like this.


The straps were then folded in half lengthwise right sides together and sewn. Then turned rightside out and ironed.


Then it was time to make the zippered section. First the fabric pieces were sewn together.


Then I added an invisible zipper. I would have used a regular zipper, but I couldn't find one in my stash that matched. My invisible zipper color wasn't great either, but not as noticable.


Next, I sewed the outside pockets onto the outside pieces of the purse. I trimmed the sides of the pocket, but left the extra at the bottom - for now.


Then it was time to sew the small inside pocket onto the inside piece of the purse.


Now it was time to sew the side to the purse. Here it is with one side attached.


Then the other side was added along with the large inside pocket - which is really a divider.  And now both are attached. Raw seams for the rag look all the way around.


Then it was time to attach the straps and the zippered top. I don't think I attached the zipper part correctly, but it works.


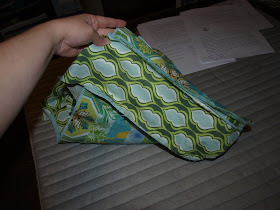
Here is my finished purse.


I still need to wash it to get the full rag effect as the fabric frays a bit.

If you enjoyed my blog, like my Facebook Page to get notification of new blog posts.

Thanks!

Dallas Fabric District

I went to the Dallas Fabric District last week and only visited a few of the stores. This is by far, the best place to go buy fabric in the area.

First I went to Wherehouse Fabrics. They have a Facebook page, but it's not very active. They are located at 2675 Perth STreet, but have 3 stores on Perth. The main one is at the corner of Perth and Harry Hines. This is the one I will show you first.

Here is a table they have of apparel fabrics - all are $6/yard. Lots of unique stuff in here. SOme of it's knit, there are wovens, and sheers. A huge mix of stuff. You really have to dig and pull them out to really get a good look.


A view into the "main area"


This lady is always here and is very nice and helpful. She's cutting some cotton woven I found in the front area. I didn't get a photo - and should have. All their cotton wovens are $5/yard and voiles are $6/yard. You can find Anna Maria Horner, Amy Butler, many Free Spirit Designers, and occasionally Tula Pink and Cotton & Steel.


Next I went to their more "outlet" type store next door.  Here is what it looks like from the outside.


I always check out this table first. It's a remnant table and it's $2.50/yard - but you have to take the entire piece. Sometimes the pieces are 5 yards. I find lots of goodies here. It's a mix of all types of fabric.


They also have several tables of apparel fabric here as well, and these are $3.50/yard. I find stuff here, but I don't think it's as nice as the "main" store's selection.


They also have cotton wovens here and here they are $3.50/yard. I have found Liberty and Kokka fabrics here. You just never know what you will find.


Then I went next door to Super Textiles and saw Steve. His store is one of my favorites.

This is what it looks like on the outside. Just a sign that says Fabrics. The credit card receipt will show Super Textiles.


This wall is mostly knit fabrics. Most are $4/yard. He has some very nice french terry and it's $5/yard. He often has a great selection of ITY knits as well.


Here are some cotton wovens. He has a lot of Free Spirit designers and those black dots mean they are $4/yard. The blue dots are $3/yard.


Another rack of cotton wovens. See his color dot price guide?


Steve also has a variety of other fabrics and I often find some ally nice stretch lace here. He also boasts the largest selection of buttons in the US. He has 3 rooms filled with buttons. If you need a particular button - he probably has it.

Then I went to C&C next door.

Lots of cotton wovens here. Most are $5/yard. They also have knits on the right wall. And there is a second room with more fabric. This is also a great place for stretch lace. I always check out their table at the very back that has $2/yard fabrics. I often find some great stuff on it - Usually Michael Miller cotton Wovens and some knits.


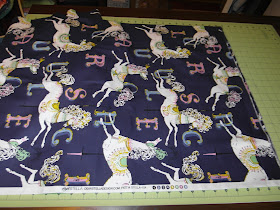
On this trip I did find some Dear Stella Carousel Horse in Indigo. I see people looking for this on the destash pages all the time.


This is just to show you the sign for C&C.


So if you haven't been, go check it out. There is a new Facebook Group for just the DFW area (I'm an Admin). Join it and look for upcoming organized trips to the Dallas Fabric District.

And please check out my Facebook page to see what I'm sewing.

Thanks!