Winter Wear Designs Traveler Tee

I love Winter Wear Designs patterns, but I always seem to miss the cut off on Suzanne's tester calls. I think she felt sorry for me this time, because she told me she'd make room for me! I was thrilled as I was head over heels in love with the line drawing she had posted of the Traveler Tee.


I am a sucker for patterns that allow me to mix wovens and knits together. This is mainly because I tend to save scraps and have a tendency to pick up amazing remnants in the fabric district that are not big enough for an entire project. I used a mauve poly jersey and a rayon woven (if you recognize it, I've used it for 2 different tops,  both of which are Winter Wear patterns).


The Traveler Tee above was the first one I made and I made a size too big! My bust is 37.5" and the size large stated 38" and I figured my bust was closer to the large than the medium. Suzanne pointed out my mistake, but it was too late - I had already cut out another one. See below.


I used a poly jersey and a satin-y woven for this Traveler Tee. Both the one above and this one I made the cap sleeved version. To get a perfect corner, you must follow the instructions exactly! I love to add a strip of interfacing to my knit piece to prevent it from stretching as I sew it to the woven bodice.


Before I sewed up the Traveler Tee above, I cut out the Medium and sewed both at the same time. I decided to use the same satin-y woven I used above for this Traveler Tee. But this time I used a different portion. It gives it a totally different look. This time I paired it with a brushed nylon knit from Zenith & Quasar.


I removed 2" from the length of all the Traveler Tees I made. As you can see, the medium is significantly shorter on me than the large ones above.


This one is also a cap sleeve and has the longer back.


The pattern got a final tweak - although no changes were made to the size medium, I still printed it out and made another Traveler Tee.


I made this Traveler Tee with a rayon spandex knit and a cotton voile. This one is the short sleeved version with the straight hem in the back.


The pattern includes an elbow length, 3/4 length, and long sleeve option in addition to cap sleeve and short sleeve. If we were not entering Spring and Summer, I would have made a flannel and sweater knit version with long sleeves. I'm putting it on my fall sewing list now!


I really love the fit of the Traveler Tee and have already worn 2 of the tops I made. I'm debating on trying to take in the large ones or give them to my mother. I did wear the first large one and loved how it felt on. The only problem with it is that the armholes are a bit big and you can see my bra when I lift my arm. I will definitely be making more of these not only for this summer, but I will make a few for this fall & winter.

The Traveler Tee is part of the Winter Wear Wardrobe Builders Collection. All patterns in this collection are $5! They are all great basics that are beginner or adventurous beginner friendly.

Follow me on Instagram and Facebook!

Disclosure: This post may contain affiliate links. These links provide me with a small compensation if you make a purchase using my link. There is not cost to you when you do this. My thoughts and opinions given in this blog post are mine.

Greenstyle Creations Staple Tank

Greenstyle Creations always has the trendiest patterns when it comes to activewear, but sometimes you really need a basic everyday pattern. That is why they just released the Staple Tank. It's a simple tank top that has two finishing options - banded or binding. It's perfect to wear on its own or as a layering piece.


I made this one in an athletic knit I found in my stash. It's a beautiful heathered teal color that will coordinate with many of my athletic leggings. Here I'm wearing my leggings I made with Vibrant Vapors from Zenith & Quasar. This print is currently at preorder.


I do have a swayback and did not make any adjustments for it during testing and ended up with a bit of pooling at the small of my back. I hope to correct this when I make my next Staple Tank.


I also want to note that the front and back have nearly the same amount of scoop - there may be a 1/4" difference. So it is very easy to get the front and back mixed up after you sew them together. Be sure to mark the back piece so you can easily identify it.


After I made my Staple Tank, I noticed it went perfectly with my Midway Bomber Jacket I recently made. You can find my blog post about it HERE.


The Staple Tank also looks amazing with the Chelsea Pants.


Grab the Staple Tank for $8.50 through Wednesday, March 27th.

Follow me on Instagram and Facebook!

Disclosure: This post may contain affiliate links. These links provide me with a small compensation if you make a purchase using my link. There is not cost to you when you do this. My thoughts and opinions given in this blog post are mine.

Ellie & Mac High Hopes Dolman

Ellie & Mac has a new women's top out. It's the High Hopes Dolman. It's a loose fit dolman top with a banded bottom and cuffed sleeves.


 Since we are going into spring and warmer weather, I made mine with a lightweight sweater knit.


I removed 1.5" from the length of the body and the sleeves, but I probably could have removed more as this sweater knit wants to grow. The pattern does not include length/shorten lines, so I had to draw my own.


I made the regular scoop neck, but the neckline ended up very big. I blame the sweater knit.


I decided to wear the High Hopes Dolman off the shoulder and it looks so cute this way. The pattern does include an off the shoulder option.


I wore my George + Ginger Road Trip Bodysuit under my High Hopes Dolman and really love how it looks.


The High Hopes Dolman is on sale for $3.85 through March 24th. In addition, all patterns are on sale for 40% off.

Follow me on Instagram and Facebook!

Disclosure: This post may contain affiliate links. These links provide me with a small compensation if you make a purchase using my link. There is not cost to you when you do this. My thoughts and opinions given in this blog post are mine.

Greenstyle Creations Midway Bomber Jacket

I really have been needing a good jacket for spring. Something that can keep me warm and somewhat dry as I run into work in the Spring. I also did not want a hood. Enter the Greenstyle Creations Midway Bomber Jacket.


It took me excruciatingly long to pick fabric, ribbing, and a zipper. I have such a huge stash and everything I looked at I would have loved to use. So I might just have to make another.


 For this Midway Bomber Jacket, I used Stormy Streaks Yoga Swim Spandex (YSS) from Zenith & Quasar fabric. This fabric is currently at preorder.


 This print is so beautiful. It's shades of navy blue and mint.


I love that the sleeves on the Midway Bomber Jacket are shaped. The have a seam down the outside edge. The pattern includes an option to have a stripe along that seam.


Since everything was completely enclosed when sewing in the lining, I decided to go ahead and sew the cuffs so that they had enclosed seams too. My Midway Bomber Jacket is completely reversible, but it does not have a reversible zipper. But I rarely zip up my jacket.


I had so many fabrics that coordinated that I had a hard time picking a lining and ribbing. I had a few friends over to sew and they all said I needed to use the Blue Tint Tactel. I used a white ribbing, which is not what I had planned. I was leaning toward using Navy, but was convinced that I needed white for more of a Spring look.


The Midway Bomber Jacket looks amazing with my Chelsea Pants and Tank (coming soon).


I realized as I wrote this blog post that I forgot to get a photo of my Midway Bomber Jacket zipped up with my white tank above. So here is one with my "new" Tank.


The one thing I will probably regret, is that I did not add the pockets to my Midway Bomber Jacket. They have welt pockets, but they are done in a manner that I am not familiar with. I'll be sure to try them on my next one.

Follow me on Instagram and Facebook!

Disclosure: This post may contain affiliate links. These links provide me with a small compensation if you make a purchase using my link. There is not cost to you when you do this. My thoughts and opinions given in this blog post are mine.

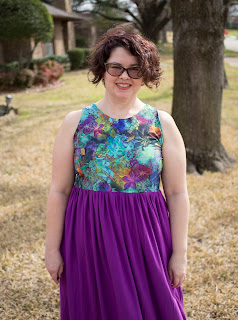
Ellie & Mac Sunny Day Dress

It's Wacky Wednesday at Ellie & Mac! Every Wednesday 6 patterns are marked down to only $1! This week I'm showing off the Sunny Day Tunic & Dress pattern.


And yes, I did make the dress version!


I really do love maxi length dresses and do find that I wear them often in the summer.


The Sunny Day Tunic & Dress is a super quick sew with only 1 pattern piece. The front and back bodice pieces are the same. The bodice is lined and the skirt is a rectangle that you are given the dimensions for.


For my Sunny Dress, I used fabrics from Zenith & Quasar. The bodice is a plush brushed poly in the Secret Garden print.


The skirt is a brushed nylon that is so soft. I just love the feel of the brushed nylon on my legs.


Be sure to check out all the patterns in the Wacky Wednesday sale HERE!


Follow me on Instagram and Facebook!

Disclosure: This post may contain affiliate links. These links provide me with a small compensation if you make a purchase using my link. There is not cost to you when you do this. My thoughts and opinions given in this blog post are mine.

Zenith & Quasar American Heart Association Fundraiser

I'm so excited about the Cardiology Flash Preorder at Zenith & Quasar. After starting this year off wearing a heart monitor for 30 days, I've come to appreciate the awareness campaigns that the American Heart Association does. Lilly's kids are participating in a school fundraiser for the American Heart Association and to help them with their fundraising goals, Lilly is offering the Cardiology prints with 20% of the funds going to the American Heart Association.


This is the Burgundy Cardiology print with the Cardiology stripe coordinate.


Here's a closer look. The hearts are anatomically correct drawings.


I made this shirt a few years ago and the fabric I used for the sleeves shrunk when I washed it and was uncomfortable to wear. Last time Lilly ran these designs, I bought a yard of the cardiology stripes and used it to make new sleeves for my top.


This is the Charcoal Cardiology.


I wore this to my last Cardiology appointment and gave my cardiologist an infinity scarf made with this fabric.


I love this print. The Charcoal colorway also looks great with the Cardiology stripes.


Here's a closeup.


This preorder is only open through March 15th! Order HERE!

Follow me on Instagram and Facebook!

Disclosure: This post may contain affiliate links. These links provide me with a small compensation if you make a purchase using my link. There is not cost to you when you do this. My thoughts and opinions given in this blog post are mine.

George + Ginger Road Trip Body Suit

Only Kristi of George + Ginger could get me to ever make a bodysuit. The Road Trip Bodysuit is the Pattern of the Month for March and I decided to try it.


I've actually been thinking about making a bodysuit for a while now. I have a couple of semi sheer tops that I love and have to wear a camisole under. My pear shape causes my camisole to always ride up and it ends up bunching up around my waist and I am constantly pulling it down.


So I thought a nude color bodysuit would be perfect to wear under all those semi sheer tops. It would stay put and a nude color would keep it less conspicuous.


Well, it would be hard to show you my Road Trip Bodysuit under a top, so I looked through my closet and found this wrap from Chico's and I'm loving how it looks with the Road Trip Bodysuit.


I love this wrap, but have only worn it once. Maybe I'll be brave and wear it with my Road Trip Bodysuit and these Greenstyle Creations Chelsea Pants for a date night.


The Road Trip Bodysuit calls for a binding, but I did bands on mine.


I'm 5' tall and took 1.5" out of the length of the body. If I make another Road Trip Bodysuit, I'll be taking a half inch off the top of the straps as I find them a little too tall for my petite height.


I love the low scoop back. The back is two pieces which allows for doing a sway back adjustment - which I did. But I still have some extra fabric and I think it's because the straps are a little too long on me. 


The Road Trip Bodysuit is 25% the entire month of March. I'll be posting photos soon of a top I recently made with a lightweight sweater knit that this Road Trip Bodysuit was perfect for wearing under.

Follow me on Instagram and Facebook!

Disclosure: This post may contain affiliate links. These links provide me with a small compensation if you make a purchase using my link. There is not cost to you when you do this. My thoughts and opinions given in this blog post are mine.