Greenstyle Creations Power Sports Bra

Last week I showed you my Ice Cream Workout attire that I made using Greenstyle Patterns and Zenith & Quasar Fabric. Today, I want to go a little more in depth into the Power Sports Bra. I've been getting a lot of comments on Facebook and Instagram about things like sizing, sewing in foam cups, and about what the inside looks like. 


First off sizing - The pattern has instructions to take your under bust measurement and your full bust measurements. You then subtract your under  bust from your full bust to get your cup size. This method works for most people, but not for me. I must have an odd build because I have a 6" difference which according to the pattern would mean I need an F cup and a 32 band. I typically buy 34 B or 34 C bras in the store. The first Power Sports Bra that I made was a 32 band with B cups, it was on the small side and I knew that this time, I needed to go with the C cups. The fit this time is perfect. 


The past few weeks I have made several bras and bralettes and I have had to try more than one size for many. Or made one that was wearable, but knew what to change for the next. I'm glad I now know what fits me perfectly in the Power Sports Bra so I can make many more. The Power Sports Bra has many options and one thing I did differently was the straps. The pattern has instructions to make straps using fabric and elastic. I opted to use some latex free foldover elastic (foe) that I had. I just zig-zag stitched the foe in half and cut the piece to the length specific for the straps. I might use bra strapping for my next one.  


The Power Sports Bra has several back options. This is the strappy u-back. There is also a strappy cross back, a racer back (with an optional pocket), and racer back with an optional key hole. You can make it as plain or fancy as you want. There are also a number of power sports bra hacks with lots of fancy strap configurations. Since I'm not the sort of person to walk around in public in just my sports bra and leggings, I tend to keep it simple. The Power Sports Bra is to be finished with an elastic band under the bust, but I am highly allergic to latex and have a very hard time finding wide latex free elastic - especially in fun colors. So I opted to finish mine with a knit band. I cut my band at 80% of my underbust measurement and at 5" tall to make it close to 2" finished.


Here is the inside of my Power Sports Bra. The bra is fully lined. You can line with powernet for extra support. I used the same fabric for the outside and inside - yoga swim spandex. Technically I could use this for swimming. Many patterns have instructions for the addition of foam cups. The Power Sports Bra instructions are not very detailed when it comes to this step.  After I construct the lining, I go ahead and sew my cups in place. You can use premade cups or make your own from bra foam. Buying premade is much easier. I made my own for this project, and do not have a photo of them. Most foam cups come shaped as a rectangle or a triangle. When I sew the cups in, I just tack them into place at the corners. I lay my lining wrong side up and place the foam cups so that the cups are like domes on the fabric. I place each cup centered on each side. I press them down, flattening them with one hand while I pin them in place with the other. I then sew them in place with my sewing machine using a zig zag stitch. 


Here's a closer look at the stitches. Normally I'd use thread that matches better, but I'll admit that I was lazy. Which worked out great for these photos. As you can see, it doesn't take many stitches. Do you have to sew them in place? No - but if you don't they will shift around when you wash them, and possibly when you wear them. I prefer to take the time to sew them in place and avoid the frustration later of trying to get them to lay the right way after every washing. Trust me - it's so worth it!


If you are ready to sew your own Power Sports Bra, there is a video sew along at  at https://www.sewingwithsarah.com/sewalong/power-bra-sewalong-day-1/


Follow me on Instagram and Facebook!

Disclosure: This post may contain affiliate links. These links provide me with a small compensation if you make a purchase using my link. There is not cost to you when you do this. My thoughts and opinions given in this blog post are mine.

Greenstyle Creations Tie Back Tank

The Greenstyle Creations Tie Back Tank is one of three patterns of the month. I decided to make one to put an HTV design on that is free on the Greenstyle website. I've had this idea in my head for a long time now and finally made it happen.


Those that know me know that I don't run. I don't even think I could run if I had to due to rheumatoid arthritis. I never liked running it was always so terribly painful - probably due to RA. But if I was going to run, it would be because I feared for my life or needed to catch the ice cream truck. 


When I saw this HTV design I knew it was perfect for me and I had the perfect fabric to go with it. Zenith & Quasar had this cute ice cream design and it was a match made in ice cream heaven. I recently bought rose gold HTV from Heat Transfer Source and thought it would look beautiful, yet subtle, on this pale mocha rayon spandex. It was raining and overcast when I took photos which made it even more difficult to photograph. 


The tie back tank is a relaxed fit. It has two back options, regular and a racer back. I made the racer back. You have the option to do a binding or bands on the neckline and armholes. I opted to do a binding. 


The top can be worn open or tied. You can also overlap the bottom pieces and hem them together it you don't care to have a knot. If you do a lot of floor exercises on your back you probably don't want a knot. I did not remove any length from the tie back top and I am 5' tall. 


I also made the power sports bra to go with my tie back tank and my Inspire Tights Shorts. 


I think this set turned out so cute! 


Here's another look at the HTV design. If you can't read it, it says "The only running I do is after the ice cream truck". This design - and many others - are free!


Here's a closer look at the ice cream print. The Inspire Tights make great shorts. 


Follow me on Instagram and Facebook!

Disclosure: This post may contain affiliate links. These links provide me with a small compensation if you make a purchase using my link. There is not cost to you when you do this. My thoughts and opinions given in this blog post are mine.

Patterns for Pirates Fierce Bra

If you are on Facebook and in the Zenith & Quasar Group you know I have been doing a "thing" lately that I call Ta-Ta Tuesdays. I am slowly working my way through all the bra and bralette patterns I have collected and finally making them. I'm using Yoga Swim Spandex from Zenith & Quasar for each one so that I have a baseline comparison for fit and know that fabric is not a factor affecting fit. 


This is my third week to do Ta-Ta Tuesday and I have just one bra to show this week. I intend to blog about all of them, but have been a bit busy and way behind on blogging. This week I'm showing off the Patterns for Pirates Fierce Bra. This bra can be made with a variety of fabric for different levels of hold. I did line mine with a light mesh and sewed in bra cups as I plan to use this as a sports bra. 


I had to order some latex free foldover elastic (FOE) that was 1" wide for this pattern. I have lots of latex free FOE, but I did not have enough length of any one color for all the straps. I could only find black and white instock anywhere online and decided to go with the black. I then picked the Stormy Streaks YSS for the body. This fabric is currently at preorder. It's one of my favorites and I have a jacket and leggings made with it. 


The instructions were so easy to follow and the bra went together without any issues. My FOE did end up being slighly narrower than 1", but it was close enough. The bra is to be finished with elastic under the bust, but I used athletic brushed poly as I am completely out of wider latex free elastic. When I took these photos, I did not realize that I had one of my straps twisted up a bit. I really love the strappy back and find it very comfortable. I was worried that the straps would be too long on my petite frame, but I find them comfortable and they are not tight. If I was more well endowed, I would probably want my straps a bit tighter. I also like the crossover of the back pieces. It adds interest, but was very easy to do. 


This pattern looks way more complicated than it is. It is beginner friendly and there is a link to a series of videos that Patterns for Pirates has on their YouTube channel if you run into questions along the way. This is a pattern that is easy to do all on a sewing machine. A sewing machine is the best machine for most of the steps. 

Follow me on Instagram and Facebook!

Disclosure: This post may contain affiliate links. These links provide me with a small compensation if you make a purchase using my link. There is not cost to you when you do this. My thoughts and opinions given in this blog post are mine.

Zenith & Quasar Yoga Interlock vs Yoga Swim Spandex (YSS)

I apologize in advance. If you don't want to see a series of photos of my behind, leave now. As admin of Zenith & Quasar Fabric it was my duty to show how "squat proof" the new Yoga Interlock Solids were. The Yoga Swim Solids have been around a few years and most are familiar with them, but the yoga interlock is completely new to Z&Q and there was no better way to compare the two than to do a visual side by side comparison.  The Yoga Interlock is on the left and the Yoga Swim Spandex (YSS) is on the right. 

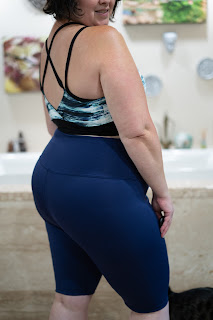
Back view: I used the Greenstyle Creations Inspire Tights with no side seam for my pattern and used the ultra highrise waistband from Greenstyle that is free. I cut these to have a 10" inseam. The Yoga Interlock is more compressive and has more vertical stretch. The YSS is a bit thinner and shows my lumps and bumps more. I'm wearing the same underwear in each photo - you will see it later. I apparently didn't take the time to smooth it out on my butt after pulling the YSS pair of shorts on. 


Side view - No thing to really see here other than my bunched up undies on the right. 


I'm wearing the Greenstyle Creations No Show Briefs made with YSS. These things really are no-show, but you do have to smooth them down some when wearing them under tight clothing. The YSS has been my favorite fabric for these. The yoga interlock should work perfectly as well. And yes - those are hearts and kitties on my undies.


Squat Shots - I'm not seeing any kitties or hearts. 


And for good measure you get me trying to climb into the bath tub. Seriously this thing is so deep. I would need a step stool to get in easily. Still no sign of any kitties.


Both of these fabric are a very tight weave and I would call both "squat-proof". I do think the yoga interlock is a bit more slimming. While it has a little more compression, I don't feel like I'm being squeezed. The extra stretch vertically does seam to allow for a better fit and better ease in movement - you can see a difference in the photos above that I could get my right leg up higher in the yoga interlock. 


Follow me on Instagram and Facebook!

Disclosure: This post may contain affiliate links. These links provide me with a small compensation if you make a purchase using my link. There is not cost to you when you do this. My thoughts and opinions given in this blog post are mine.

Winter Wear Designs Journey Tunic & Dress

Two months ago Suzanne Winter of Winter Wear Designs posted that she needed a few more testers for a boho-style tunic she had in testing that was for wovens. I love boho style tunics and I just so happen to have quite a few lightweight apparel wovens sitting in my stash. This is the Journey Tunic & Dress


I made the non-tiered version of the tunic body with a gathered back bodice, the sleeves with a ruffle, and collarless neckline. The non-tiered version is considered a pattern included hack. There are not full pattern pieces for this version, but the pattern tells you how much length to add to the bodice pieces in lieu of adding the ruffle to the hem.


There are two back options - straight or gathered. I opted for the gathered back bodice for the extra ease. My booty  appreciate having the extra room. 


My fabric is from Super Textiles. It is a crepe chiffon georgette. It is a gorgeous chevron design is amazingly saturated colors of coral, magenta, teal, navy, and white. 


This print is so fun! I love how light it is. It will be perfect to wear through the summer. I had plans to make another Journey Tunic. I thought Suzanne might post an updated pattern (even though I had no issues with this one) or that I might have found some time to make a second or third. 


I love the neckline detail. The yoke doesn't quite make a v shape, it is squared off  at the bottom. The pattern also includes an option for a high collar with a back opening and an open collar that is the same neckline as I made, but with a collar at the top edge. 


The Journey Tunic & Dress is on sale for $5.95 through June 9th!

Follow me on Instagram and Facebook!

Disclosure: This post may contain affiliate links. These links provide me with a small compensation if you make a purchase using my link. There is not cost to you when you do this. My thoughts and opinions given in this blog post are mine.