Sew it Youself - The Laundry Day Tee into a MLM company Top

I went to my first ever MLM company party on May 1st. I only remember the date since it was the day before my birthday.

I went out of curiosity and to see what the items were like. I had purchased leggings from an online party and wanted to see if they had any tops that would match. I didn't find a matching top, but I did end up buying one that I liked the fit of and 2 pairs of leggings to match.

The top I bought was the MLM company Tee.

I really liked the loose fit and the box cut sides. One thing I didn't like was the short sleeves. I live in 3/4 length sleeves year round.  I also thought I could easily make this!

To make my own MLM company tee, I started by taking some measurements of the one I bought. I bought a size small. The width of the bottom hem was 44 inches. The length was 29 inches.

The basic shape of the MLM company Tee was very Similar to the Love Notions Laundry Day Tee. The Laundry Day Tee is a free pattern when you join the Facebook Group.

I took the pattern piece for my size (also is the size small) and laid it on top of some interfacing to trace and make my adjustments to.  The length I make my Laundry Day Tee is 30 inches (just a tad shorter than the tunic length cut line) - so I left the length the same on my new pattern.

The first adjustment I made was to add width to the bottom hem line. Since my MLM company Tee was 44 inches wide, I marked on my interfacing at 22.5 inches (to account for the seam allowance).


Marking my spot.


I then needed to trace a line from below my bust to the new hem line.

Here is showing where I drew my line from under the bust to the hem. I normally make my Laundry Day Tee a small at the bust and grade out a bit to give it more fullness - if you are wondering why my pattern is not cut on the size line.


I then added a straight line for the bottom hem to match the shape of the MLM company Tee.


Here is what my finished pattern piece looks like. The pattern piece did not change above the bust.


I constructed my tee following the directions for the laundry day tee until I get to the side seams.

I serge the sides of the front and back pieces. I then pin them together stopping 9 inches from the bottom hem.


This  inch section will not be sewn together. These will be the box cut slit on the sides.


I then stitched the side seams on my sewing machine using a stretch stitch (this is the lightening bolt looking stitch on my machine). I did a 1/2 inch seam allowance.


Stopping and back stitching at the 9" mark.


I then hem the front and back using my coverstitch.


Showing the back side of the hem.


I then cut off the corner that stuck out.


I folded the corner in first - like this.


Then folded the side seam and clipped it in place.


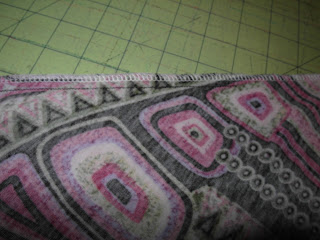
Close up of the side seams of the box cut slit.


I then sewed the side seams up from the bottom hem using my stretch stitch on my sewing machine. After both side seams are hemmed, I then sew across the top of the box cut slit to reinforce it.


This is what the inside will look like.


Here I am wearing my DIY MLM company Tee.


And here is the box cut slit.


I love the fit of this top! I already made 2 and will definitely be making a few more.


Summer Pants

I am not a fan of dresses or skirts. If I wear one, I'm bound to show my rear to someone when I bend over. If I wear a maxi skirt or dress, then I'm likely to trip on the hem and fall. Yes I am clumsy.  But I do love how nice and cool they are in the heat of the Texas summer. But I also work indoors in an office that is usually too cold for my liking. So what's a girl to do? This girl decided to try some wide leg pants this year.

One of the benefits of being an Admin for Lilly at Zenith & Quasar, is that every now and then she sends me stuff she gets from her supplier to try out or that has been discontinued and there is not enough for her to stock. She sent me a yard of this gorgeous mint and white variegated Supplex last year. I was waiting for the perfect project and coordinate to come along before I cut into it. Lilly has some Supplex in stock Here, but there will be a preorder for all the available colors in August. Join the Facebook Group for updates.

One day, I got some remnants from Mandy at Made Whimsy (whom I also Admin for). One of the remnants was a piece of her 12 oz mint cotton Lycra. I noticed immediately that it was a perfect match to the Supplex. I knew then I was going to make either leggings or pants with the supplex and needed to order some Mint cotton Lycra for a top.

I love the A Sparkly Baby Women's Palauchos. They are a super quick sew and take a yard of fabric, plus a small bit of fabric for the waist band.


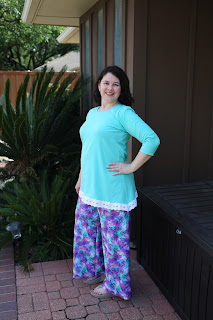
I made the Stitch Upon a Time Merryweather for the top. I've made many of these with color blocking and this was my first one to make without. But after I made it, I decided if I hemmed it, it would be shorter than I wanted. So I added an eyelet lace trim to the hem. I also made it 3/4 length sleeves since I do get cold at work and find this is a comfortable length for me to wear year round.


Zenith & Quasar also carries a variety of swim knits in fun prints. This pair I made using the Shattered Glass Swim knit. The swim knit is also UPF50 rated.


And my mint top matches it too.


I also made a pair using the Butterfly Garden Swim knit.


And it also goes great with my mint top.


So I am thrilled to have 3 pants that I can wear with my mint top. I was really worried initially that I would only wear it with the mint and white Supplex pants, but it works great with the others.

I think the loose breezy style will keep me cool this summer.

3 Material Girlz $7 Poly Knit!

3 Material Girls is doing something different for their current pre-order. They are offering some light weight poly knits. And they are only $7/yard!

Sarah Evans sent me 2 prints to sew up. One is a super adorable owl print, and the other is a brown and mint baby's breath print that goes great with the owls.

This poly knit is 92% polyester and 8% spandex. It has 4-way stretch and is 160 gsm. It reminds me of a light weight interlock twist yarn (ITY) knit. It has great drape.

I decided to try a new pattern and make the 1 Puddle Lane Miss Maggie top with the owls. I love this top pattern - it's very similar to a beloved store bought top. I'm planning a hack to this pattern to make it identical to my store bought one.

I love the low drape in the front and the built in tank underneath. I didn't have enough of the owl fabric, so I used a solid brown for the tank part. I'm thinking I'll make one in black and leave off the tank part so that I can change the look up by wearing different colors underneath.

I then used the brown and mint baby's breath print to make the Patterns for Pirates Straight Palazzo pants. This was my first time making these, and I really love the fit. I'm going to wear wide leg pants all summer.


I love the drape - and these owls are too cute!


I definitely recommend both of these pattern and the poly knit. I enjoyed working with the fabric and these patterns.

Stitch Upon a Time Boxerwear - Enclosed Seams

*** I wrote this post quite awhile ago and for some reason, I never finished it and posted it. So today while I was babysitting my embroidery machine as I did some bowling shirts, I decided to look at the draft posts I had and decided to finish this one. So - I've made some edits to this post as I went through it ***

The heathered brushed poly from Zenith & Quasar is Amazing! It's the softest fabric ever. It makes the most comfortable underwear you have ever worn - it's like you are wearing nothing (in a good way).

I've made my son the Stitch Upon a Time Boxerwear before, and he really likes the no fly version with enclosed seams. I had some of the charcoal heathered brushed poly leftover from another project and made him a pair with it. This color is currently out of stock, but other colors are still available. There will be a preorder for all colors of heathered brushed poly and supplex in August.

The first step is to sew the dart into both the inner and outer front piece.


Then trim the seam allowance and tie the ends of the thread into a knot.


Both ready to go.


Now sew the two pieces together that make the back rear seam.


Now attach one of the crotch pieces to one of the front leg pieces. *I now sew both front pieces on at the same time making a sandwich.*


Then you sew the other side of the front piece to the other front leg piece. So that you get something that resembles underwear.


Now you roll the edges up like a burrito leaving the exposed seams on each side of the front piece exposed.


You then sew the second front piece onto these exposed edges.


It will look like this.


Then you pull it through one end making the shorts right side out.


Turn them inside out and sew the inseam.


Now finish with your preferred waist band and leg bands (or none).


These are a quick sew and come with high and low rise, and short and long legs. I made the high rise with long legs in these photos.

These brushed poly boxerwear have become my son's favorites.

Designer Stitch Julie Blouse

I recently tested for a new designer - Ann Grose of Designer Stitch. She has worked as a freelance designer for 28 years. She resides in Australia where she teaches classes.

On May 22nd, she released an entire collection of patterns. This is one of them. Ann's patterns cover sizes 2 - 26. Be sure to check her website to see them all. http://designerstitch.com/  Prices on the website are in Australian dollars and will be much less in US dollars with the current exchange rate.

I tested the Julie Blouse. I applied to test the pattern because I loved the style of it. It had a surplice front and a longer back (to cover my rear) and a loose fit.

The pattern, when printed, went together perfectly. The pattern pieces were clearly labeled.

The instructions were mostly easy to follow. There were a few that were tricky, but Ann was very helpful assisting when I did not understand an instruction. She has revised the instructions to make them clearer.

For my top, I used a poly/rayon blend fabric I've had in my stash for a very long time. It's soft and silky feeling. I'm thinking I'll try another one in a voile.

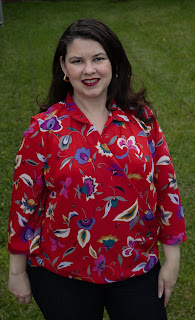
Here I am in my Julie Blouse.


I love the long back!

There is a back center pleat giving some extra ease.


The back easily covers my backside.


Overall, I'm very pleased with my top. This is a pattern that I will definitely use again.