ITS Time to Sew Itch to Stitch Blog Tour 2018


Image may contain: text and indoor


I'm so excited to be a part of the ITS Time to Sew Blog Tour! For the Blog Tour, I decided to make a new to me pattern and an old favorite. Thanks to Simply by Ti and Sly Fox Fabrics for supplying me with fabric for the tour.

I love doing blog tours. They force me to commit to sew something on a deadline. For some reason, I do better with a looming deadline. I bought the Mountain View Pull-on Jeans when they released it big plans to make a million pairs as they looked just like my beloved Jag Jeans. I live in pull-on pants! But life and other commitments (pattern tests and blog tours) kept me from making a pair. I even bought stretch denim months ago to make some with. So when I signed up for this blog tour - I knew I had to finally make the Mountain View Pull-on Jeans! Nothing like a deadline to make it happen! And I was working on a shorter timeline as I'm on vacation somewhere in the Gulf of Mexico on a cruise to the Panama Canal as you read this! So if you leave me any comments, I won't see them for awhile. Both Patterns I made are on sale today for $8.


I received some fabulous stretch twill from Simply by Ti in Burgundy and Fuchsia. I ran out of time to make a pair of Mountain View Pull-on Jeans with the Fuchsia - Sorry Ti!


These pants fit so great! I made a muslin with some really wild and very retro stretch woven to see if I needed any fit adjustments and there were no adjustments needed! Yay for small miracles! My muslin pair fit great and my husband said he liked them! I plan to go ahead and finish them and wear them - so be on the lookout for them. I did adjust the length to be 29" inseam for a finished inseam of 28".


Now that I made the Mountain View Pull-on Jeans, I'm so mad at myself for not making them sooner! Seriously - they fit great and feel so good on. The front pockets are the perfect size. Big enough to hold stuff, but not so big that they bunch up.


I put the back pockets where the pattern piece had them, but they feel a little low on my behind. I'll try to play with pocket placement on my next pair. My muslin pair was made without pockets and without the faux fly - so I probably should have at least taken the time to play with pocket placement on them. Lesson learned.


This Burgundy stretch twill is just amazing. It's a gorgeous rich color that will be worn so much this fall. The stretch twill has great stretch and recovery. I've made pants with the Simply by Ti Navy and Olive (no longer in stock) stretch twill and they are in constant rotation in my wardrobe.  I now need to grab the Cinnamon and Teal colors next! I kept wanting to type "pants" instead of "jeans" every time I types Mountain View Pull-on Jeans because, I intentionally tries to  make mine look more like "pants" than "jeans" so that I can wear them to work and not be looked at in a "why are you wearing jeans to work?" way. So no rivets or fun pocket design on my "pants".


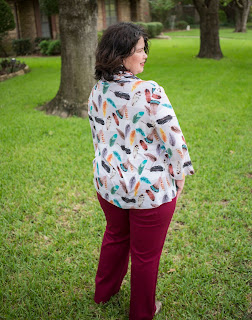
I then needed a beautiful new top to wear with my Mountain View Pull-on Jeans. I received the prettiest bamboo spandex from Sly Fox Fabrics. I had good intentions to make another Itch to Stitch pattern that I haven't tried yet, but I was worried about having time to make a muslin and then a final piece for my blog. So I went to one of my favorite Itch to Stitch patterns - the Bellavista. I tested the Bellavista and you can see all the beautiful versions I made HERE.


This fabric from Sly Fox Fabrics is from their Bohemian Soul RVJ line. RVJ stands for Rayon Viscose Jersey. It's so soft and has incredible stretch. The Bellavista is perfect for drapey and stretchy fabric like this.


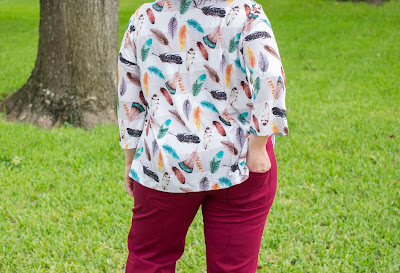
This print is named Sahara Breeze. It has a beautiful white and soft grey striped background behind a flurry of colorful feathers. The stripes are delicate and not extremely visible in my photos - just as they are in real life.


I make the Bellavista per the pattern - except for the sleeves. I removed 1.5" from the sleeve length for my height, but did not remove length from the body as I like it this length.


One little thing I did do different on this Bellavista was to make it a tiny bit swingy-er. The Bellavista already has a flowy body, but I added a few inches to the swing as I had adequate fabric to do so and figured I'd use as much of my fabric as possible. Cutting the pattern pieces as is wouldn't have left any usable scraps anyways, so I might as well give my top some extra width.


My favorite thing about the Bellavista is the huge cowl! It's perfectly shaped to give that big dramatic drape that I love, yet the neckline is actually higher on my chest and I don't flash anyone when I bend over. The Bellavista does include a neckband if you wanted to make one without the cowl - but I've never done it.


I love my new outfit and can't wait to wear it to work. I know both of these pieces will get a whole lot of wear over the next few months.

Here's a schedule of all the bloggers participating. Do them a favor and try to check out their posts by clicking on the graphic below.


Be sure to visit all the wonderful sponsors for the ITS Time to Sew Blog Tour 2018!


Last, but not least - be sure to enter to win one of the amazing prizes provided by our generous Sponsors!

a Rafflecopter giveaway

Follow me on Instagram and Facebook!

Disclosure: This post may contain affiliate links. These links provide me with a small compensation if you make a purchase using my link. There is not cost to you when you do this. My thoughts and opinions given in this blog post are mine.

Sew Big Fabrics Black Tie Birds

The current Round at Sew Big Fabrics is Black Tie Birds. This round is really cool. If you love birds and subtle prints, this round is probably for you.

I'll start by showing you the front of my Sinclair Patterns Bianca Shrug that I made. The Black Tie Burlap is an amazing coordinate. It would make an amazing cardigan, dress, top, leggings - you name it - all by itself.


I was sent the Caged Birds panel. I normally don't do anything "risky" when I get strike offs, but decided to take a risk with this panel and I LOVE how it came out!


I used part of the Caged Birds panel for one sleeve. I wanted the birds to fly out of that cage and go down my arm. And I think I did pretty darn good!


I was seriously terrified as I cut,  thinking I would botch it completely by cutting the wrong sleeve or just misjudging that it was all going to fit on the Caged Birds panel.


I cut my back bodice piece first. I wanted the chain from the cage to end right at top of the piece and I placed my pattern piece as far to the left on the panel as I could.


Here's a closeup of the Caged Birds panel. It's hard to see, but the key, chain, and a few birds are a faux silvery glitter. You can see the pattern of the Black Tie Burlap here as it is also the background on the Caged Birds panel.


I'm smiling so big because of how happy I am I pulled this off!


I hope everyone I know doesn't get tired of seeing me wear this shrug, because I plan to wear it all the time!


The Black Tie Birds Preorder closes on September 24th. Below you can see the other prints and panels being offered. All prints and panels are offered on cotton lycra (what I sewed), french terry, double brushed poly, and cotton woven.

No automatic alt text available.

So - when I completed my Bianca Shrug, I thought I was late to post what I made. The strike off came toward the end of the week, my mom came to visit, and then I frantically sewed. Then it was pouring rain a few days straight so I decided to take my photos regardless. I don't like ending up on the naughty list! And here's what I got. Enjoy laughing at me.


Thanks for reading my blog!
Follow me on Instagram and Facebook!

Disclosure: This post may contain affiliate links. These links provide me with a small compensation if you make a purchase using my link. There is not cost to you when you do this. My thoughts and opinions given in this blog post are mine.

Ellie & Mac Women's Flounce Tee

I love the new Flounce Tee from Ellie and Mac! It's a loose fit tee with a flounce that goes around the shoulders. There are multiple sleeve lengths and I tested the short sleeve version. It also has 3/4 and long sleeve options. The pattern is on sale for $3.85 through Sunday, September 16th. In addition, the entire shop is on sale for 25% off for the month of September.

Since we are heading into fall, I made my Flounce Tee with a crushed velvet.


I love the loose fit of the body. It's just loose enough that it skims over my problem areas, but not so loose that it's really swingy.


I love the feminine touch the flounce gives to what is basic tee shirt body.


I left my flounce unhemmed. If you have ever sewn with crushed velvet - you probably know why. Crushed velvet can be the biggest pain to sew. It curls like crazy and can shift around so easily. I considered doing a rolled hem, but decided to leave it as is. If after a few washes it starts to look crazy - I'll go head and attempt to do a rolled hem on my serger.


I'm wearing my Flounce Tee with some black fitted slacks. This is how I'm likely to wear it to work. But I'm thinking it will be really cute with some skinny jeans for a date night outfit.


My patterned fabric makes it a bit hard to see the flounce. The side view below I think shows it off better.


The Flounce Tee pattern recommends using a knit with 50% 4-way stretch. This crushed velvet has 2-way stretch and the required 50% stretch. I think 2-way stretch knit will work for this pattern. I've even thought about making one with a woven (non-stretch) flounce - as there really isn't any negative ease in the pattern.


I'm also toying with the idea of making a Flounce Tee with a flounce that's long enough to meet the hem of the short sleeves. I think it would give a very dramatic look.


I made my Flounce Tee in a size large bust graded to XL hips. I removed 2" from the length for my height. I was able to make this Flounce Tee with a 2 yard cut and still had some good sized scraps leftover. The pattern is on sale until September 16th. Be sure to look at all the tester photos in the listing. There are so many beautiful versions to inspire you.

Follow me on Instagram and Facebook!

Disclosure: This post may contain affiliate links. These links provide me with a small compensation if you make a purchase using my link. There is not cost to you when you do this. My thoughts and opinions given in this blog post are mine.

Duck Butt Designs Back to Fall Hoodie

It's Fall according to calendar, so I've been doing some fall sewing. What best than a pattern with fall in the name? I grabbed the Back to Fall (BTF) Hoodie from Duck Butt Designs. But here's the thing, I really don't like hoodies. It's a good thing I can sew, because that means I can make it without the hood! I know - you are probably thinking that's sacrilegious. But look how amazing my BTF looks sans hood!


I did make a few other modifications to the BTF pattern as well. I'll talk about those in a minute. But first, I want to mention one change that I'm going to make on my next one. The pocket. I love the pocket, but when I made it, it ended up on my left. I need it on my right side - my dominant hand side. So consider that if you decide to make one.


I'm short. 5' tall short. I typically remove 2" from most tops. This one has a lot of pieces on the front and it does not have any lengthen/shorten lines. So I made my own lines to shorten at.


I took 1" out of the length of the middle piece, and 1" from the length of the bottom piece. I then took 2" from the length of the back piece. I just fudged my sleeves to get them to fit on my fabric. I decided to do a simple neckband since I was forgoing the hood. I had thought about a cowl, but will probably do one on my next BTF. I also graded my BTF from a 10 bust to a 14 hip. I graded from below the shoulder color blocked piece. It took a bit of playing around with pieces to get both sides of my BTF to match with the grading - but it was so worth all that effort!


Fabric - The light colored pieces you see are a sweater knit. I found it in the Dallas Fabric District and it came as a tube. It's heavy and silky soft. I have no idea what it is, but it feels amazing and I've been hoarding it for the perfect project. I think I picked the right one.


The print is one of my own designs on Spoonflower. It is named Septarian Nodule. I had it printed on their cotton spandex jersey. I got 1 yard and I used up almost every inch of that yard.


I had a hard time deciding what fabric to use for the inside of my pocket. I really wanted to save some of this fabulous sweater knit for another project, but I was also trying to save a bit o my Septarian Nodule fabric. In the end, I decided I could always buy more of my print from Spoonflower.


Back to adjustments I made to the BTF - It calls for a bottom band. I tried my BTF on before I added any bands to figure out how long to make my sleeve cuffs and to see how long the top was. Well, it was the perfect length as is, so I decided to just hem by BTF. I decided to make my arm cuffs go to my wrists. In the photo below I folded the cuffs up. This way I'm able to wear it long sleeved or 3/4 length sleeves. I love versatility.


I absolutely love my BTF with all my modifications. I currently have 10 yards of cotton lycra with my photos printed as 1 yard panels on their way to me. I got 2 yard sized panels of 5 different photographs. I'm definitely going to be making at least 1 BTF from my new fabrics.

I'm getting ready to head out on vacation very soon and will not be back until the end of September. Fall should be in Texas by then and I'll be all set with my BTF waiting for me. I hope you will visit Duck Butt Designs and see all their great patterns. They have a few for free that are worth checking out.  The free patterns can be seen HERE. Let me just say - the plain pants (both kids and adult) are amazing! Head over to the Duck Butt Designs Sew & Chat Facebook Group and get the codes from the pinned post to get the free patterns. Be sure to sign up on the website for the newsletter - you get a code for $3 off your next purchase and a code to get the Essential Raglan for FREE!


Follow me on Instagram and Facebook!

Disclosure: This post may contain affiliate links. These links provide me with a small compensation if you make a purchase using my link. There is not cost to you when you do this. My thoughts and opinions given in this blog post are mine.
Nature's Fabrics Bamboo Spandex Jersey and a Hack to the Halla Sunny Day

Nature's Fabrics is having a sale on Bamboo Spandex Jersey! It's 15% off through September 16th! You will not find a wider selection of bamboo spandex jersey anywhere - they have so many solids and some gorgeous prints.

Are you ready for fall? I know I am. This Autumn Fox print is so adorable and perfect for fall sewing.


The bamboo spandex jersey was just perfect for the new Halla Patterns Women's Sunny Day Top & Dress.


The Autumn Fox is paired with the Soft Olive bamboo spandex jersey.


I also used the Soft Olive bamboo spandex jersey for this pattern hack to the Sunny Day.


I used a woven scrap I had in my stash for the yoke. Instead of cutting 4 yoke pieces, I cut two and cut them on a fold where the cut edge would be on the yoke for the center of the top.


 I also decided to add a yoke to the back of the top as well. For this I drew a line on the back pattern piece about 4" from the shoulder seam. I then traced the upper bodice piece and added 1/2" to the bottom where a drew my line. I then folded the back bodice on the line I drew. I cut my two yokes with the top bodice piece I made. I then decided to have gathers on my bottom bodice piece, so I folded my fabric to use the remaining width after cutting my front piece and placed the back bodice as far from the fold as I could. I then cut on an imaginary line from the fold to my piece. I gathered the top of the back bodice and attached it to the back yoke.


 I really loved how this came out! I plan to make a few more this way.  I also want to note that I had only 1 yard of the Autumn Fox and 1 yard of the Soft Olive bamboo spandex jersey. It's possible to get a size 10/12 graded to 14/16 hips out of a yard if you are short like me!


I then immediately had to make another hacked Sunny Day all with knit.


For this one, I used fabric that I designed. This is my Ernst Haeckel Bats at Golden Hour print from Spoonflower on Modern Jersey.


I used a Dark Brown Rayon Spandex for the yoke and sleeves.


I really love the curved hem on the Sunny Day.


 Check out all the amazing bamboo spandex jersey fabrics on sale at Nature's Fabrics HERE. There are 139 options! The bamboo spandex jersey is amazingly soft and the Soft Olive and Autumn Fox are a nice heavy weight at 240 and 245 gsm respectively. Bamboo spandex jersey is perfect for making apparel. It has very minimal shrinkage and wear well without pilling. The sale ends on September 16th! No code needed, prices are shown already discounted.

Follow me on Instagram and Facebook!

Disclosure: This post may contain affiliate links. These links provide me with a small compensation if you make a purchase using my link. There is not cost to you when you do this. My thoughts and opinions given in this blog post are mine.