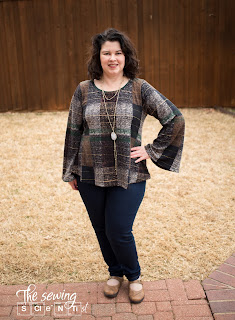
There are multiple lengths: crop, shirt, tunic, and dress. Then there are sooo many sleeve options: ruffle, bell, and tiered bells. And I almost forgot - a Dolman style version.
For the pattern test, I was assigned to do the shirt length ruffle sleeve. I'll admit that when I first saw the line drawings, the ruffle sleeve was my least favorite. The bell sleeves all looked amazing! After I made the ruffle sleeve, I was in love!
I love all the ease in the RuLo - it's so comfortable to wear and hides my belly.
Sewing Tip #1 - If doing the ruffle sleeve, pick a fabric with a backside that is indistinguishable from the front. The back of the ruffle will be seen depending on how it hangs and moves with you.
Sewing Tip #2 - Don't be Aimee. Use the same color thread on the top and bottom when hemming your ruffle. The backside of the ruffle will be seen - see Sewing Tip #1.
I love the scoop neckline. It's modest, yet open enough that it's not too modest. The Dolman version has a much wider neckline.
UPDATE - HERE THEY ARE
I do love the relaxed fit, but might try a size or two down on my next one. But it worked great for this funky fabric - it's like a reversed french terry with a pattern on it.
I am so in love with this version. Not sure if it's the pattern or the plaid sweater knit - or a combination of the two. This one is going to get worn all the time!
And check out the perfect pattern matching I did!
I've never been a big fan of plaid - but now, I'm thinking I need more!
I made these to take with me to New York City for Fashion Week next month where I'll see George + Ginger's show and finally meet the designer in person - along with several other friends I've made in the online sewing community.
Follow me on Instagram and Facebook!
Disclosure: This post may contain affiliate links. These links provide me with a small compensation if you make a purchase using my link. There is not cost to you when you do this. My thoughts and opinions given in this blog post are mine.


No comments:
Post a Comment