Celebrate Earth Day By Making a T-Shirt Quilt

Please welcome Dana to my Blog today!


Dana Miller Coastside Quilt Studio & Dana Miller Fiber Arts -------------------------- danamillerfiberarts.com @danamillerfiberarts & @coastsidequiltstudio on Instagram


Earth Day is a time for us to reflect on our impact on the planet and find ways to reduce our environmental footprint. One way we can do this is by repurposing items we already own, rather than buying new ones. Making a t-shirt quilt is a great way to preserve our memories of things or people, which allows us to look back and appreciate our life. By repurposing clothing that may have otherwise ended up in a landfill, we have now upcycled that clothing into a quilt that can be used on a bed or couch.


Tshirt Quilt for a Bar Mitzvah Gift


Making a t-shirt quilt can help reduce landfill waste in a few ways:

First, when we throw away old t-shirts, they end up in landfills where they take up space and can take a long time to decompose. By repurposing these old t-shirts into a quilt, we are giving them a new life and keeping them out of the landfill.


Second, the production of new textiles contributes to environmental pollution through the use of resources like water, energy, and chemicals. By reusing old t-shirts instead of buying new fabric, we are reducing the demand for new textiles and the environmental impact of their production.


Finally, when we make a t-shirt quilt, we are creating a durable and long-lasting item that can be used for many years. This means that we are reducing the need for people to buy new blankets or comforters that would eventually end up in the landfill.


Memory Quilt made from a father’s clothing who passed away.


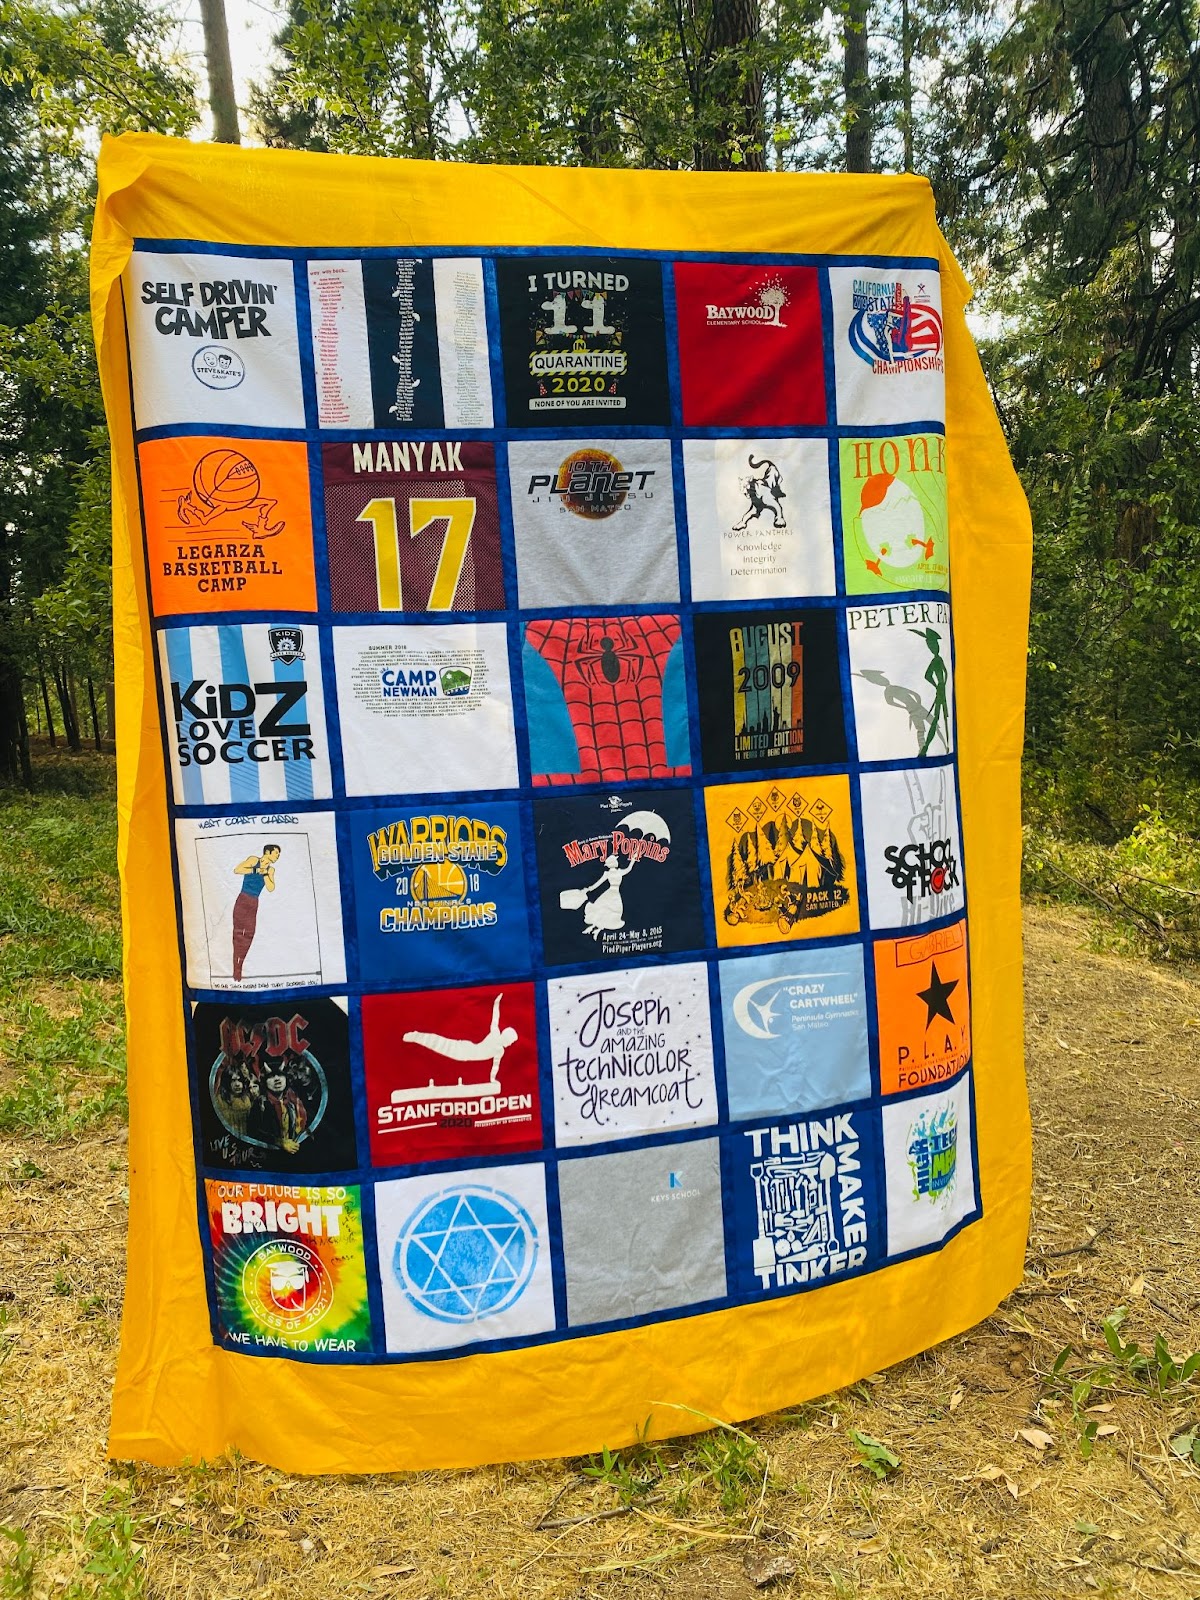
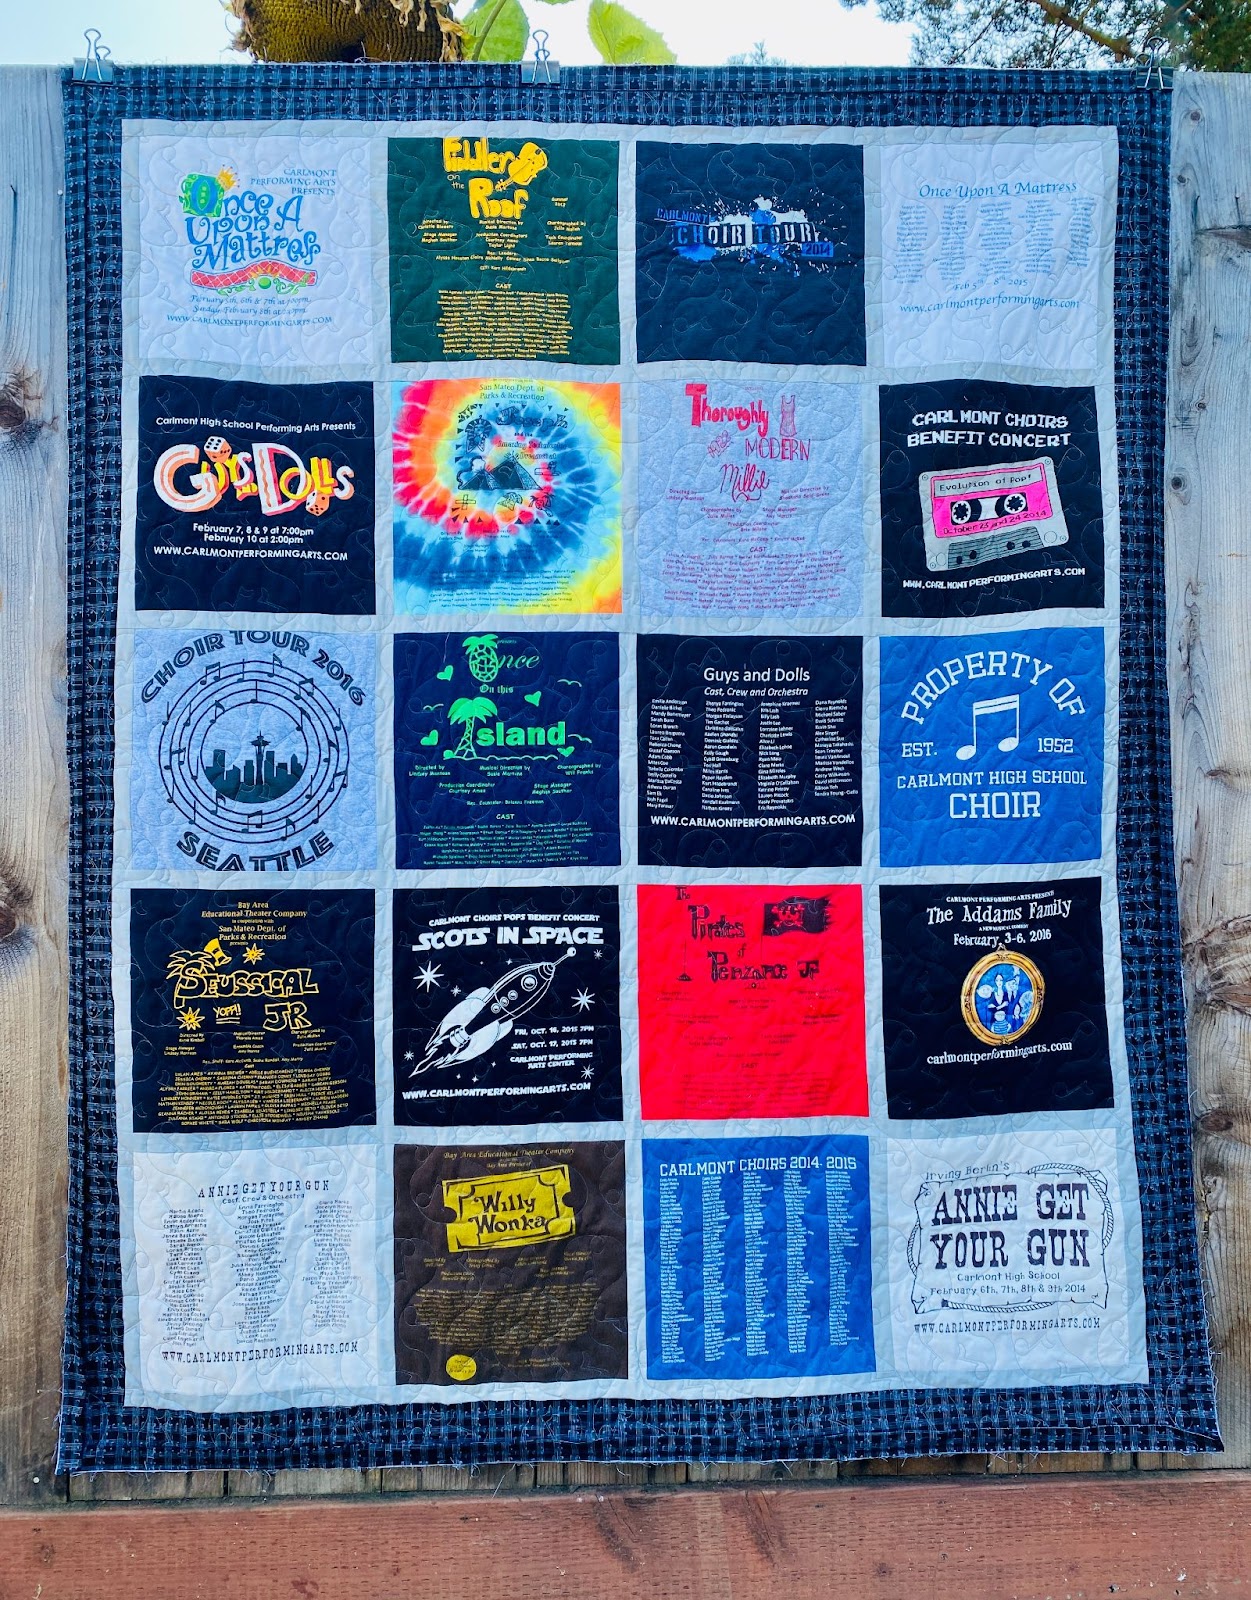
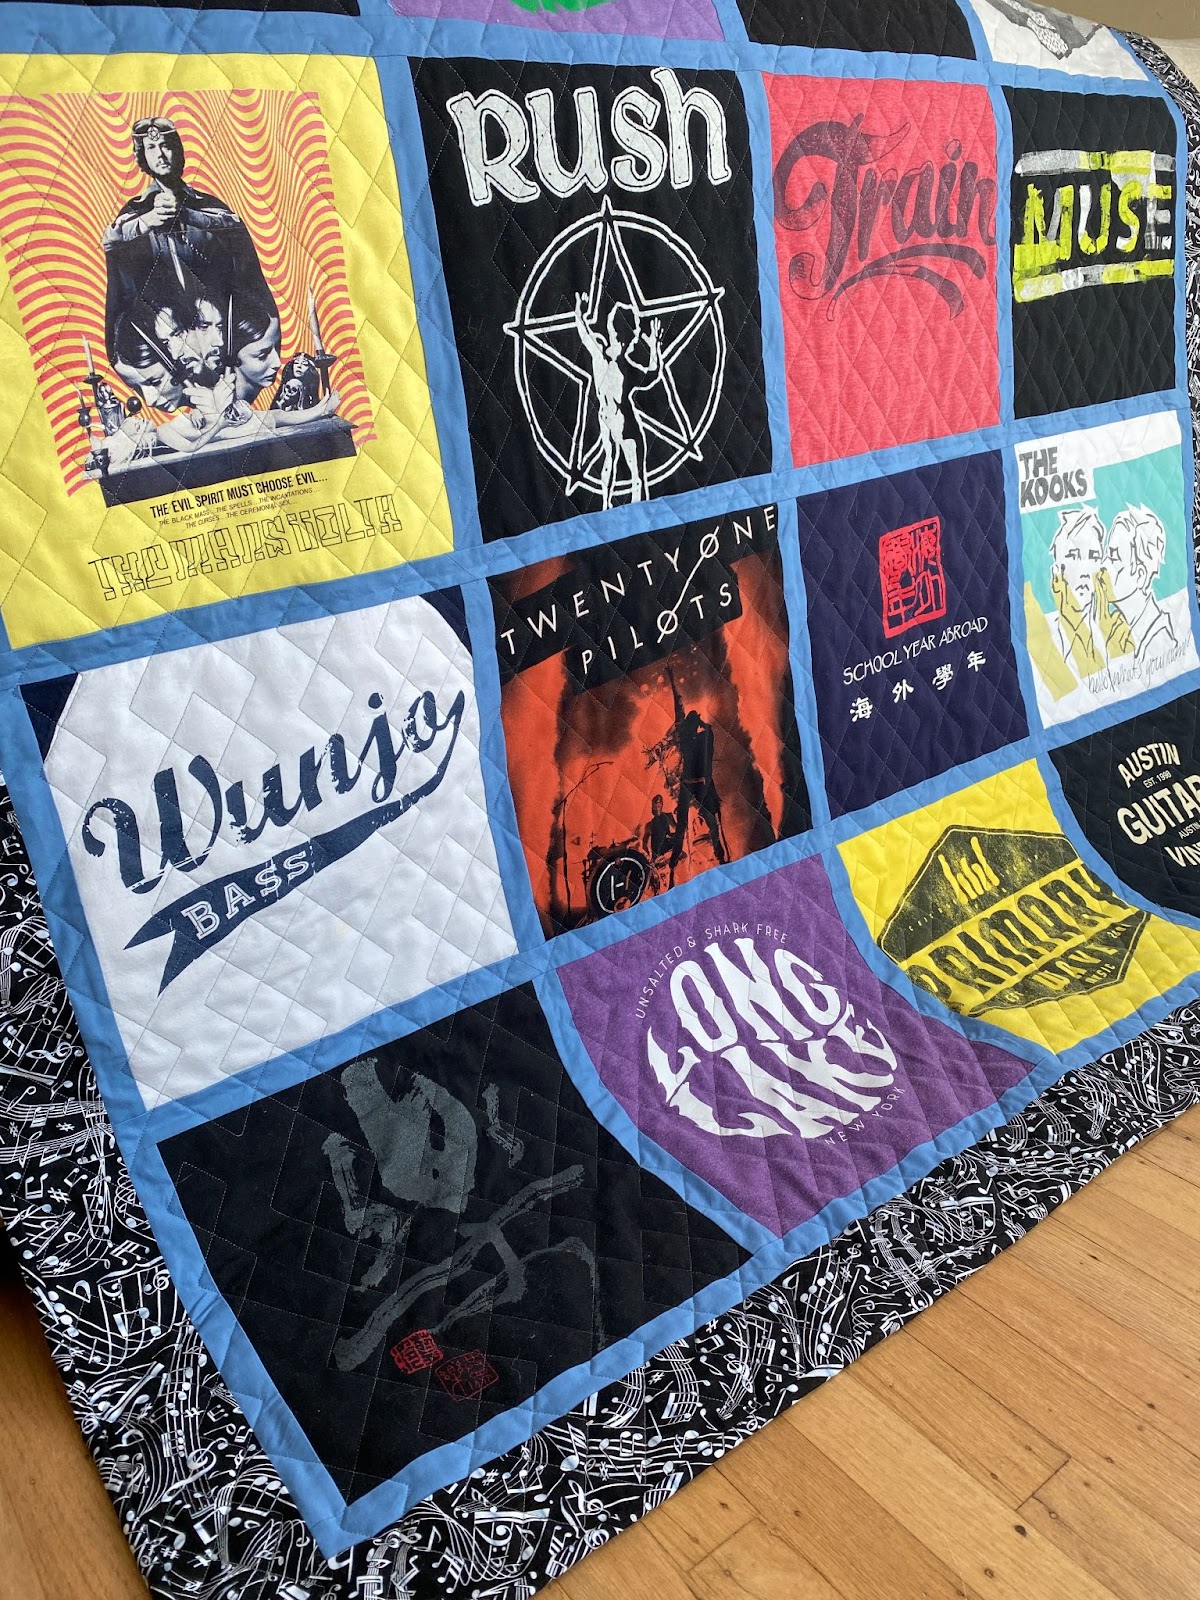
Creating a tshirt quilt is a perfect activity for those who are new to quilting or looking for a creative way to upcycle their old t-shirts. Sports we participated in, concerts we attended, or the clothing from a loved one who has passed are just a few ideas of what a t-shirt or memory quilt can consist of. 


The first step in making a t-shirt quilt is to gather your materials. You'll need old t-shirts/clothing, a rotary cutter, a cutting mat, a ruler, and a sewing machine. 


Once you have your materials, you'll need to prepare the t-shirts. Cut out the front and back of each t-shirt and discard the sleeves and collar. If the design on the t-shirt is smaller than the size you want for your quilt squares, you can add additional fabric to make up the difference.


Next, cut the t-shirt squares to the same size using your rotary cutter and ruler. You can choose any size you like, but 12-inch squares are a good size for a cozy quilt. Be sure to leave a ½” seam allowance around each square.


Tshirt Quilt for an Graduation Gift


Once you have all of your squares cut out, you will need to back them with a sturdy iron on interfacing to stabilize the fabric. Then you can start piecing them together. Lay out the squares in the pattern you want, and then sew them together in rows using a ¼” seam allowance. Press the seams to one side as you go along.


Once you have all of your rows sewn together, you can start sewing the rows together to form the quilt top. Again, be sure to press the seams to one side as you go along.


Once your quilt top is complete, it's time to add the batting and backing. You can use any type of batting you like, but cotton batting is a good choice for a lightweight quilt. Cut the batting and backing so they are 2-4” larger than your quilt top, and then layer them together with the quilt top on top.


Baste the layers together by smoothing them out and pinning with safety pins. Then quilt the layers together using your sewing machine or by hand. You can choose any quilting pattern you like, but a simple straight stitch works well.


Once you've finished quilting, trim the edges of the quilt and bind it using your favorite binding method. And voila! You now have a beautiful and cozy t-shirt quilt that you can enjoy for years to come.


Remember, the small blue dot in all of space that we know of, is the only place that can support human life. Let’s all do our part to preserve our beautiful planet.


Tshirt and memory quilts are my specialty! Please contact me if you would like to have one made!


Dana Miller

dana@danamillerfiberarts.com

@danamillerfiberarts 

@coastsidequiltstudio 


Tshirt Quilt for an 18th birthday gift

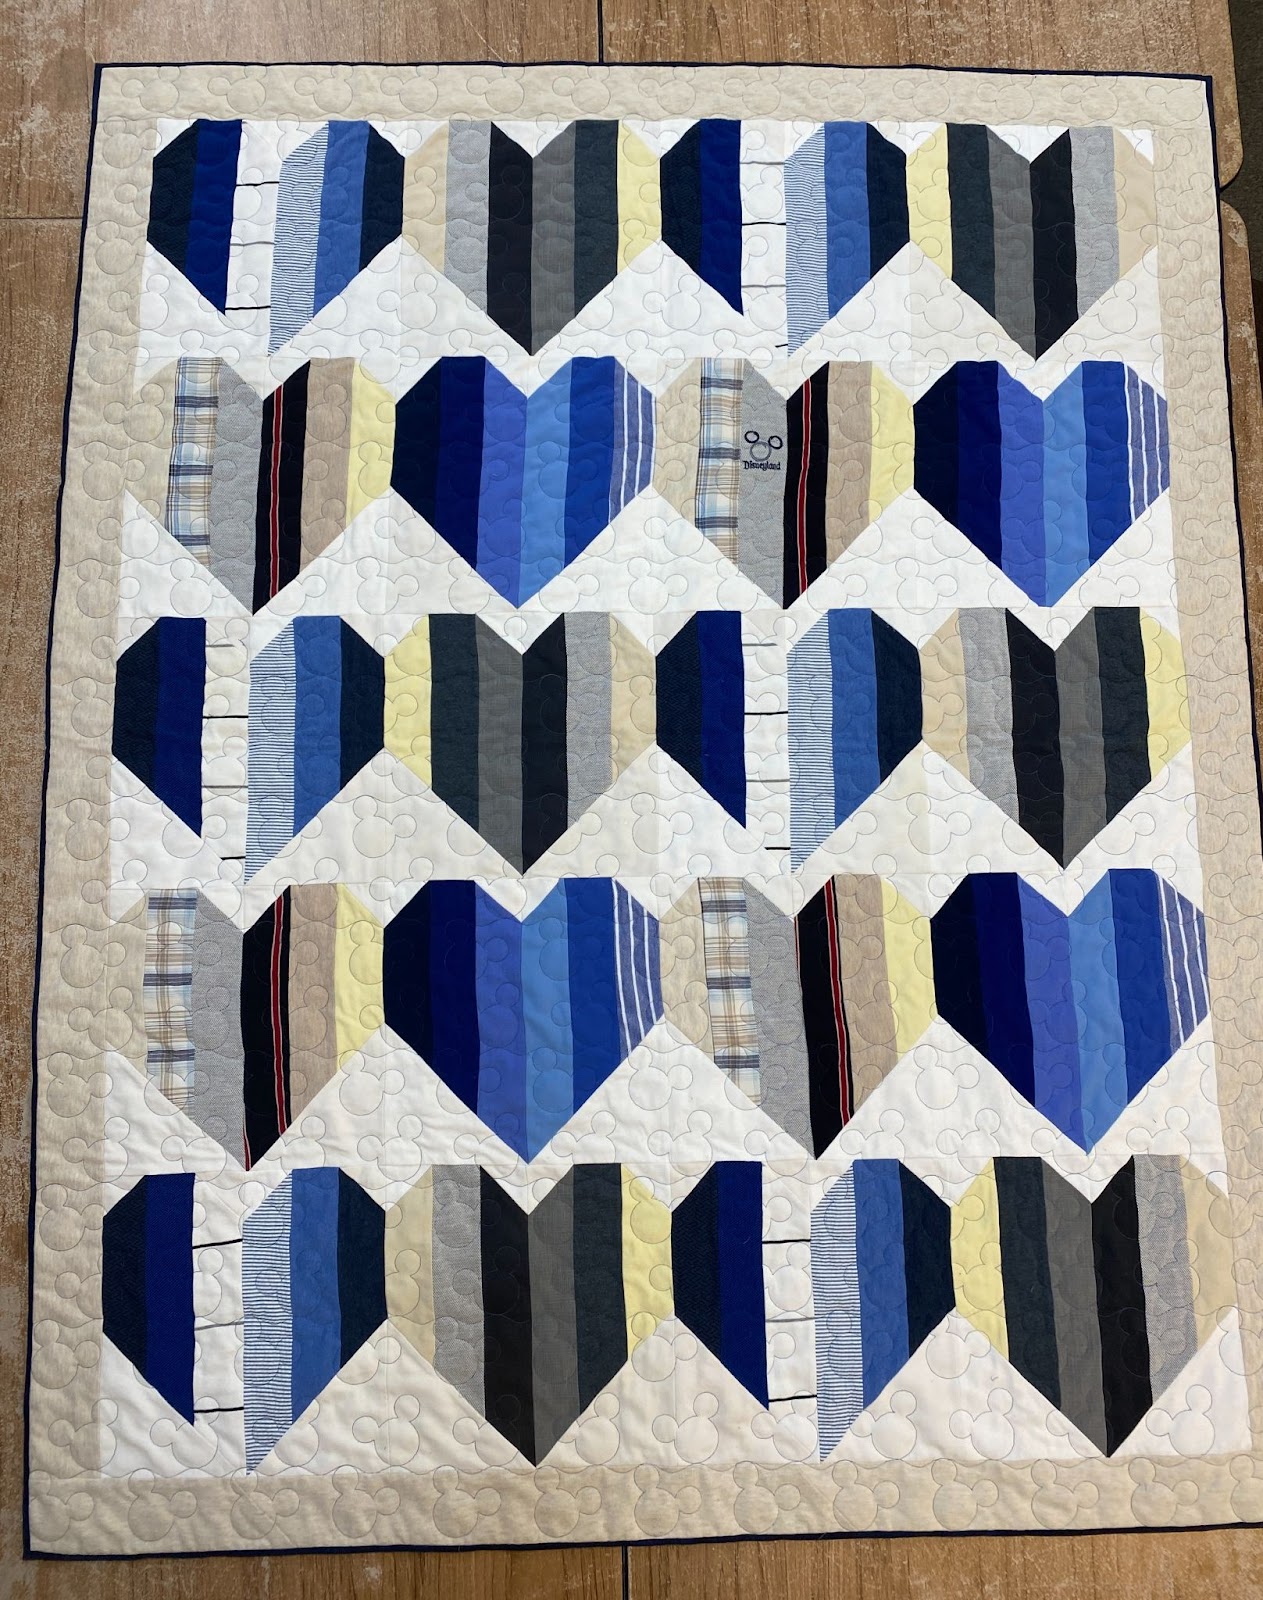
Preserving the memories of their father

Upcycling denim jeans into a quilt


Disclosure: This post may contain affiliate links. These links provide me with a small compensation if you make a purchase using my link. There is not cost to you when you do this. My thoughts and opinions given in this blog post are mine.

A Heart Full of Scraps / New life for Old Blankets

Today on the Earth Day Blog Hop we have Amanda of Sassy Strawberry Print Co!


Hello! 


I’m Amanda, the person behind all that goes on at SassyStrawberryPrintCo - I started my studies as a plant biologist, but took a turn into polymer chemistry once I saw the growth that had to be done to find sustainable alternatives to what we traditionally use now. Before that however, I was a person who just loved going thrift shopping - every visit always seems to spark my curiosity with something new to figure out, and I’d always leave with a new (to me) cassette for my boombox. One place I always love to look through is the blankets and linens aisle, where you’ll find anything from crocheted doilies to king sized comforters. Best part is that the latter will make an amazing base for a new quilt! Quilts have a tradition of using every last scrap of usable fabric - both on the inside and out - to make a functional piece of art. My favorite example of this is Caryl Bryer Fallert’s Rail Fence, who talks about how the batting was a worn quilt that was filled itself with what was likely someone’s long johns. 

(Link: https://bryerpatch.com/images/quiltrecords/FirstQuilt/RailFence.htm )


Even if you aren’t fully comfortable with the idea of using something secondhand, I still highly encourage you to stop by and look - stores will occasionally donate excess unsold merchandise, and there’s usually a couple comforter/sheet sets that are still in their original packaging. Here’s a couple of things to keep in mind while looking: 


Washability - Excessively large or fabrics that will become heavy when waterlogged (microplush/minky especially) can cause your washer’s motor to burn out, or not be properly cleaned when washed but can still be handwashed 

Fitted/Rounded corners - Both will reduce the final size of your quilt if you plan to cut around them, and increase the time spent if you plan on unassembling and matching the previous fit 

Topstitching - If you are using the original fabric as a backing, remember that your topstitching will either need to complement what is already there, or you can seam rip it out before starting. 


Warmth - While not in issue in winter, quilts made with a comforter will be just as warm as one! If you are looking for a springtime cover, it would be more logical to use one of those scratchy pastel polyester blankets that seem to be hiding in the back of every linen closet. 

Loft/Fiber content - a lot of comforters use higher loft polyester batting which can be tricky to sew without shifting! Additionally, it’s usually recommended to stick to flame retardant cotton batting for baby quilts. 


Once we have our blanket picked out, let’s make something with it!


Despite our best efforts to tame the scrap pile, there’s always some leftover- I’ve found that mine collects mismatched jelly roll strips, leftover 1.5’ wide pieces, and odd lengths of 2.5” scrap tape. Here’s a quick pattern for using up all of those odds and ends! 


The heart panel finishes at 32” square (32.5’ unfinished) - you can leave it at this size for a decorative wall quilt, add some additional 2.5” strips around the outside for a crib quilt, or even make 4 panels for a decently sized throw blanket! 


Each panel is constructed of 16 off-center log cabin blocks. 


This pattern is also adjustable - by swapping out the accent color of 4 blocks you can change the star in the center to a different color (yellow on the diagram) or switch out the solid color blocks for a 8.5” square if you do not want to piece these. The only caveat is that you need an accurate 1/4" seam throughout to ensure your pieces are the correct size.


We’ll refer to the two colors of each block as the “Curve” and “Accent” colors - the curve color is made with 2.5” wide pieces and will be the predominant color. Don’t be intimidated - while we’re calling this the curve color, this pattern uses all straight seams to give that illusion. 


For each block, you’ll need to cut one of each of the following pieces: 


Curve:

1.5 x 1.5”

2.5 x 2.5”

2.5 x 4.5”

2.5 x 5.5”

2.5 x 7.5”


Accent:

1.5 x 1.5”

1.5 x 2.5”

1.5 x 4.5”

1.5 x 5.5”

1.5 x 7.5”

1.5 x 8.5”


Before we get started sewing, there are a couple of things to remember to keep your orientation straight: 

1 ) All seams are ironed away from the center of the block 

2 ) Newest seam will always be on the bottom of the block (closest to you) when adding a new piece and 

3 ) When adding a new piece, we’ll always add the new piece on top of the existing block, and seam on the right side every time 


This will ensure we’ll always be working in a spiral fashion around the center and placing the correct pieces on. 


Let's get started with our blocks - the first seam is sewing the 1.5” blocks together and we’ll press this seam towards the Accent color. 


Place this block right side up on your table with the accent color closest to you, and place the 1.5 x 2.5” accent piece on top - sew a ¼” seam along the right side. Press this seam towards the larger 1.5 x 2.5” piece. 


Place your growing block right side up on your table with the largest piece closest to you, and place the 2.5 x 2.5” curve piece on top and sew a ¼” seam along the right side again. Press this seam towards the 2.5 x 2.5 piece. If you’ll look closely, we’re following the orientation rules previously laid out - always sewing on the right, the newest piece on top, and the most recent seam will always be the one closest to you when attaching a new piece. We’ll keep following these, and add the rest of the pieces in the following order:

2.5 x 4.5 Curve color

1.5 x 4.5 Accent color

1.5 x 5.5 Accent color

2.5 x 5.5 Curve color

2.5 x 7.5 Curve color

1.5 x 7.5 Accent color

1.5 x 8.5 Accent color


After this last piece, your blocks should now measure 8.5” unfinished and will be ready for further assembly into the heart pattern near the beginning. Make sure to take the time to press your seams flat, and admire your handiwork!


Happy scrap-busting! 

Amanda


Restoring Old Towels

Please welcome Rachel of Little bits of love on Instagram to my blog today!


Today on the earth day blog hop I am excited to talk about a saving step you can take to help extend the life of some of the most used items in my house and probably yours as well: Towels. My household has tried to go low waste and we have switched out many of our single use items, including most paper products. Let's be real, sometimes towels feel like they aren’t meant to stand up to the day to day use of a household of four. 


We have a few towels that are starting to fray on the edges. It is frustrating as these are cosmetic imperfections and the towel is still functional. So it is time to use some items, as a quilter, I always have laying around - extra binding strips. This simple, 20-30 minute task can help you extend the life of your towels and adds a little fun flare as well. 


This blue hand towel and some extra binding I had left over are the perfect pair. 


To make binding, I usually follow Cluck Cluck Sews Binding Tutorial. I recommend taking a look here if you need a refresher or want to try making some binding yourself. 


Attach the binding to the front of the towel, with a ¼” seam all the way around. Occasionally, depending on how bad the towel is fraying on the sides you can either cut off the fraying or use a zigzag stabilizing stitch around the towel before attaching your binding.  Then, fold over and attach to the back. I personally have found using a zigzag stitch when securing it on the back is most helpful to make sure it is attached well. But really, any stitch will work. 


You see, by repurposing old binding left over (and probably too small of an amount to use on a quilt) and fixing the fraying edge of a towel you are keeping two things out of the trash can. You are finding and reusing the items you have around the house. It’s a win, for both you and mother nature. 

As a little giveaway I will be giving away some of my leftover binding strips I have over on Instagram this week. So headover to LittleBitsALove on instagram and follow along and enter. 


A little about me! My name is Rachel, I am the creator behind LittleBitsALove on instagram. I received my grandmother’s 1960’s sewing machine back in 2013 and immediately dove in head first to quilting. I made my first quilt for my husband. I took a break from sewing for a few years to start a family. When the pandemic hit, I was able to use my hoards of fabric to create headbands and masks for my coworkers and friends. It pulled me back to my machine and back into the quilting world. I can be found during the day being a stay at home parent to my two little kiddos. After bedtime however, I can usually be found in the sewing room listening to a podcast. If you want to follow along my sewing and quilting adventures I can be found on instagram at @littlebitsalove. 


Jelly Roll Rug

The Earth Day Blog Hop continues! I had to take a short break as I was mentally exhausted. It has been a lot of work! Jelly Roll Rugs are a great way to use batting scraps and leftover 2.5" strips of fabric. They are surprisingly easy and fast to make. It takes me longer to cut down the batting, sew the pieces together, and roll it up than any other step. You trim the batting scraps into 2 - 2.25" wide strips and sew them together with a zig zag stitch. *Note* The following  photos were taken from  two separate times that I made a jelly roll  rug. 

Then sew your fabric strips together.   Some people like to iron their fabric strip in half and then in half again. I don't. I like to either manually fold my pieces together or use a binding tool. 


Here is the tool I  use. It's a 1" double fold bias tape maker tool. You can also find jelly roll rug specific tools as well. I am  able to feed both the fabric and batting  through the tool. You sew the fabric and batting into a long tube and stitch along the open edge. 


I keep my roll of batting and my fabric  strip on the floor nearby. I have  to run kitties off periodically. 


After the tube is finished, it is time  to sew it into a rug shape. There is no rule of thumb, that I know of,  to follow, I just randomly pick a length for the center and get started. Once I pick the length, I fold the tube so that the sewn edges are both pointing in the same direction. Set your sewing machine to a wide zig zag and zig zag stitch between the two tubes connecting them with thread. 


When you get to the end of the row, you will bend the tube to go around the piece you started.  I push the tube toward my  needle to cause small gathers. This will allow the rug to lay flat and not turn into a bowl. You could make a bowl or basket, but for  this blog - we are making a rug.


Keep going around and around. Only try to add small  gathers at the curves. The gathers are really only needed for about 5 passes. After that, it shouldn't be needed, but stop occasionally  to place the rug on the floor to gauge it's flatness. 


Also be mindful of which way you are sewing. In the photo above I am going in the "correct" direction. In the photo below,  I am going the "wrong" way. Why is it the "wrong" way? Well, soon my rug will get too wide and I will start to hit my machine. It's best to have the rug stay in the open side of your sewing machine. 


Here's a look at my stitching. You can see the few small gathers. 


I love doing an ombre when I sew my strips together.  I have seen  some rugs that are scrappy and mix all the colors together, some that are monochromatic, and  some that are two toned with alternating colors. The choice is completely up to you. 


I  had to swap out cones of thread. This is a project that will use a lot of thread. While rethreading, I stopped to check my flatness and took a photo. 


Here is the first jelly  roll rug that I made. I loved the colors, but realized it was way too small  for my  intended use in front of this door. 


No problem! I unstitched a few inches and added to my  rug to make it  bigger. I soon realized that I really needed to make the next one more oblong as this one was ending up more round that I wanted. We used  it until I make my second one.


Here is my second rug. I thought I took a photo when I finished sewing it, but couldn't find it on my phone. I snapped this  one as I finished this blog post. It's very dirty - don't judge. We have been using this one for a bit and it's been washed a handful of times - and is definitely due for a wash. The cats LOVE sleeping on the jelly roll  rugs. They  really like the feel of them. I wasn't planning  on using the first one,  but they liked it so much I decided to keep it on the floor near my sewing room.  


I hope  you found this blog helpful. Jelly roll rugs are really fun  to make. I already have my batting strip roll ready to make another. I  really like  how easy they are to make and that they are washable. I did have to iron both of my run a tiny bit after the first wash, but subsequent washes have not required any special after wash treatment. 

The Earth Day Blog Hop will be continuing until April 22. Head over to my Instagram for some  giveaways. 


Creative Reuse Shopping

Everyone wants  to save money when crafting. Sewing and Quilting  can be expensive hobbies. Fabric bought new can be expensive. If you want to look for alternatives to buying new, and maybe save a little money, look into buying thrifted fabric or at creative reuse centers. 

Stephanie at Swooden Says has a great list of creative resuse stores across the US. You can find it  at https://swoodsonsays.com/a-creative-reuse-center-near-me-map-resource/ 

I'll talk about a few I'm familiar with below and some not on her list. 


Thistle has been  my local go-to shop for a long time. I have actually only been to the physical store a handful of times and primarily purchase from  their website and have my purchase shipped to me. What I love is that they often get vintage fabrics that are unique and  fun and sometimes I find the elusive out of print fabric that I have longed for. You just never know what you will find. Their prices are also really good and they have sales regularly. The one downside is that  you don't always know the fiber content of the material - but this is a common issue with all thrifted fabrics.


Untrash is very new. It was recently started by one of my neighbors. She sells a variety of craft items and always has a selection of fabric and notions in  her shop.


Feel Good Fibers is a fabric destashing platform. I love that shipping is free. You can find some bargains, but there are also a lot of postings for out of print fabrics that can be pricey. But it is always a fun  place to look for secondhand fabric. 


Super Textiles used to be located in Dallas, Texas on Perth Street on what was known as Fabric Alley (or the Fabric District). It was hit by a tornado in October 2019 and went to a virtual marketplace on Etsy in 2020. I loved Super Textiles for 2 things. One being that they sold a lot of dead stock fabric and you could find some fun stuff leftover from apparel makers for Anthropologie. Two - Buttons.  They have a HUGE assortment  of buttons (and a few other notions) at excellent prices. 


One of my local quilt shops, Not Your Mama's Quilt Shop, has a DeStash  Blast. This is a great opportunity to rent a spot to sell your stash you no longer want or to buy from other individuals who are looking to destash. I went last year and came home with an  armload of fabric for less than $20. Many of the Quilt Guilds had booths and had amazing deals. I found many sold fat quarter for a quarter and a yard of fabric could be bought for a buck or two. The next one is coming up and I will be going. 


My Local American Sewing Guild also has a regular fabric sale as well. It is also a great opportunity to get fabrics at an amazing price. I went last year and bought a  few bundles of quilting  cotton and some apparel fabrics.  They even had a huge amount of "scraps" that  were free! It was fun to dig around to see what I could find.  

I'd highly recommend checking with your local Guilds and Quilt Shops to see if they also offer these kinds of events. 

Then there are always thrift  stores. You would be amazed at what I find  at thrift stores. I get fabric there - sometimes full bolts. My mom found me a bolt of batting a few months ago that was unopened. It was 90" wide 20 yard bolt of Quilters Dream. I often peruse the clothing at thrift stores for fun  prints  that are cotton to cut apart for the fabric. I also check out the bedding section. Sometimes I find new sheets that I can use for quilt backs. I've also found vintage quilt tops that I plan to quilt and make a quilt coat with. If I do see a lot of fabric  in a thrift store, I will go look in their bins and pre-bagged stuff to look for things like quilting rulers and templates and have come across  some fun finds. 

I know I am likely forgetting some great online shops that specialize in  deadstock that are also great to shop at. I think  buying deadstock is a fantastic way to reduce the amount of textiles that end up in the landfill. I know there are many shops online that specialize in deadstock fabrics, but I am drawing a blank on them as I write this  blog. I honestly heave not done nearly as much fabric shopping  online as I have done in the past. I am  trying to be  more conscious of what I am buying and trying to avoid overbuying.  I hope you find these shopping suggestions helpful. If you have other places to recommend, I would love to hear them! Thanks!

Follow me on Instagram and Facebook!

Disclosure: This post may contain affiliate links. These links provide me with a small compensation if you make a purchase using my link. There is not cost to you when you do this. My thoughts and opinions given in this blog post are mine.

Quilted Postcard Tutorial

My Guest Blogger today is Erin. You can find her on Instagram @seamrippersociety

What if I told you that I could not only use up the smallest of your scraps but I could also help
you get them out of your house? If you’ve been quilting for any amount of time you inevitably
have handfuls of scraps all around your sewing room, some so small that it’s infeasible to make
anything of substance with them. Let me introduce you to the Send a Scrap Postcard Exchange.

My friend Alexis of @lexszymakowsi and I have organized a quilted postcard exchange in an
effort to clean out our closets of some of out smallest scraps and help quilters connect with each
other. Sign ups for the exchange are open now until April 15th and we ask that all postcards are
mailed by April 22nd. If you’d like to join in on the fun head to the bottom of this blog post for the
sign up link.

Now that we know what we plan to do with them let me teach you the basics of creating your
own quilted postcard. For the version shown here I chose to practice small scale FPP. For the
ones I made previously I tried out a little improv curved piecing and embroidery. Go wild, try a
new technique. This is your happy little postcard.

Materials Needed:
1. Scraps
2. Pellon 71 Peltex Ultra Firm Fusible Interfacing
3. Card stock


Once you’ve pieced your block, trim it down to a standard postcard size of 6” wide by 4” tall.
Then cut an equally sized piece of Pellon 71 Peltex Ultra Firm Fusible stabilizer.I purchased
mine from JoAnn’s. Place the pieced block on top of the fusible side of the interfacing and cover
with a old dish towel to protect your iron. Hold the iron down for a few seconds and move along
the width of the postcard until you feel you’ve fused the patchwork to the interfacing.


Once your block has been fused to the interfacing you will cut a 4” x 6” piece of card stock and
mark a line vertically one third in from the right hand side. Then you will make the three
horizontal lines that will serve as your address label. Once you have marked your postcard you
are ready to sew the two pieces together.


To sew the card stock to the fused interfacing I used a decorative satin stitch. Alexis used a
serger to finish her edges. Both are great options that creative very different effects. Use the
finishing technique that you are most comfortable with.


Once you have finished the edges you are ready to write your note, slip it into a 5” x 7” envelope
and send your artwork out into the world.


If you have more than just a few scraps to dispose of, this would be a great alternative to
holiday cards, a fun way to say Happy Birthday to loved ones, or a great way to have your kids
send out invitations for various events. Make as many or as few as you like.

If you’d like to join the postcard exchange please visit to following link to sign up. The link will
also be available in my bio on Instagram @seamrippersociety.


About me:
I am a quilter and textile artist living in Southwest Michigan with my husband Chris, two dogs,
and three cats. I primarily use scrap and thrifted fabrics in my work and love being able to
breathe new life into discarded textiles. I can be found on Instagram at @seamrippersocietyy
where you can view my latest projects. A serial top maker, I am currently working on whittling
down my WIP pile and have a goal of quilting 7 quilts by July. Wish me luck!!

Thank you Erin for participating in the Earth Day Blog Hop! 

Disclosure: This post may contain affiliate links. These links provide me with a small compensation if you make a purchase using my link. There is not cost to you when you do this. My thoughts and opinions given in this blog post are mine.

Making Reusable Paper Products with Flannel

Single use paper products have become a part of everyday life. What would we do without toilet paper or  paper towels?

Mt family has used cloth napkins for at least 20 years. I make our napkins with a layer of flannel and a layer of quilting cotton.  I have made them with a double layer of flannel.  
They are used not only fir wiping our hands and mouths at dinner, but also get used to wipe up spills and messes.  They are simply serged on the edges and I like to keep them handy in a basket. 

Old flannel napkins and scrap flannel often ends up with our cleaning supplies. 

During the beginning of the pandemic when toilet paper was scarce, I made reusable wipes. I continue to use these 3 years later. I only use these for after urinating.  It really does cut down on how much toilet paper I use 

These can be made with scrap flannel. I serged the edges. These are double ply, but single ply would work just as well. Mine are cut close to an 8" square. They are not all exactly the same size as I was using scraps. 


Soon after I began using the washable wipes, I decided to make reusable tissues. With a household of allergy sufferers,  we could go through a lot of kleenex.  As we finished off the boxes of kleenex we had on hand, I saved the boxes and decoupage them to make them sturdy. I then found a dark flannel and cut my reusable tissues to 9" by 8" so they would fit inside the box folded in half.  They are serged around the edges and are single ply. 

My husband requested that he have some that were bigger and 2ply. He keeps his in a stack on his nightstand.  We have found these to be more absorbent and softer than traditional tissues. No more raw red noses when you have a cold with cloth tissues.

Everything is washed regularly on a sanitizing cycle in our washing machine and dried on high heat. Flannel lasts a long time and makes an excellent replacement for paper products.  

Earth Day Reusable Bags

We use reusable bags when we can. I try to keep a stash of them in my car for trips to the grocery store or other shops. But we do run out of them and I forget to restock the car.   Many of the bags we use are some that I have made. I love a big oversized bag that can  hold a lot of groceries. 


When I saw this fabric by B0rWear on Spoonflower,  I knew it needed to become a reusable bag. I swear, plastic  bags are the bane of my existence and I loathe them. Especially when I see them flying  in the wind like these are picture on the fabric. So I thought it made cute and ironic reusable bags. 


I don't have a specific pattern that I use for these. After I made a few following various patterns, I understood the construction process and started just doing them my own way and with my own measurements. I found that the patterns available online often make a bag that is the same size as your traditional plastic grocery bag, and I wanted mine bigger.   I have made all sizes and have a few extra large ones for using for Sam's Club purchases. 


Reusable bags are easy to make. Below are a few resources for free patterns to inspire you.


Making reusable bags is great for using up fabric that you may not love anymore or maybe it has flaws or stains. No one really cares what your reusable grocery bags  look like. Using a cloth bag is so much sturdier and you won't have to worry about the plastic bag ripping and tearing as you carry your groceries. Most importantly, you won't be using a plastic bag!

I hope you are enjoying all the blogs on  ecofriendly sewing.  There are many more planned. If you have any feedback or questions, please leave me a comment. Thanks!