Showing posts with label blog tour. Show all posts

Quilted Postcard Tutorial

My Guest Blogger today is Erin. You can find her on Instagram @seamrippersociety

What if I told you that I could not only use up the smallest of your scraps but I could also help
you get them out of your house? If you’ve been quilting for any amount of time you inevitably
have handfuls of scraps all around your sewing room, some so small that it’s infeasible to make
anything of substance with them. Let me introduce you to the Send a Scrap Postcard Exchange.

My friend Alexis of @lexszymakowsi and I have organized a quilted postcard exchange in an
effort to clean out our closets of some of out smallest scraps and help quilters connect with each
other. Sign ups for the exchange are open now until April 15th and we ask that all postcards are
mailed by April 22nd. If you’d like to join in on the fun head to the bottom of this blog post for the
sign up link.

Now that we know what we plan to do with them let me teach you the basics of creating your
own quilted postcard. For the version shown here I chose to practice small scale FPP. For the
ones I made previously I tried out a little improv curved piecing and embroidery. Go wild, try a
new technique. This is your happy little postcard.

Materials Needed:
1. Scraps
2. Pellon 71 Peltex Ultra Firm Fusible Interfacing
3. Card stock


Once you’ve pieced your block, trim it down to a standard postcard size of 6” wide by 4” tall.
Then cut an equally sized piece of Pellon 71 Peltex Ultra Firm Fusible stabilizer.I purchased
mine from JoAnn’s. Place the pieced block on top of the fusible side of the interfacing and cover
with a old dish towel to protect your iron. Hold the iron down for a few seconds and move along
the width of the postcard until you feel you’ve fused the patchwork to the interfacing.


Once your block has been fused to the interfacing you will cut a 4” x 6” piece of card stock and
mark a line vertically one third in from the right hand side. Then you will make the three
horizontal lines that will serve as your address label. Once you have marked your postcard you
are ready to sew the two pieces together.


To sew the card stock to the fused interfacing I used a decorative satin stitch. Alexis used a
serger to finish her edges. Both are great options that creative very different effects. Use the
finishing technique that you are most comfortable with.


Once you have finished the edges you are ready to write your note, slip it into a 5” x 7” envelope
and send your artwork out into the world.


If you have more than just a few scraps to dispose of, this would be a great alternative to
holiday cards, a fun way to say Happy Birthday to loved ones, or a great way to have your kids
send out invitations for various events. Make as many or as few as you like.

If you’d like to join the postcard exchange please visit to following link to sign up. The link will
also be available in my bio on Instagram @seamrippersociety.


About me:
I am a quilter and textile artist living in Southwest Michigan with my husband Chris, two dogs,
and three cats. I primarily use scrap and thrifted fabrics in my work and love being able to
breathe new life into discarded textiles. I can be found on Instagram at @seamrippersocietyy
where you can view my latest projects. A serial top maker, I am currently working on whittling
down my WIP pile and have a goal of quilting 7 quilts by July. Wish me luck!!

Thank you Erin for participating in the Earth Day Blog Hop! 

Disclosure: This post may contain affiliate links. These links provide me with a small compensation if you make a purchase using my link. There is not cost to you when you do this. My thoughts and opinions given in this blog post are mine.

Itch to Stitch Spotlight September


I always look forward to the Itch to Stitch  Blog Tour. This year's theme is September Spotlight! Each blogger is highlighting a pattern or two that was released back in the early days of Itch to Stitch. Select patterns are on sale during the tour each day for 25% off.

Here are the Bloggers for the ITS September Spotlight Itch to Stitch Blog Tour

September 16th 
September 17th 
September 18th 
September 19th 
September 20th 

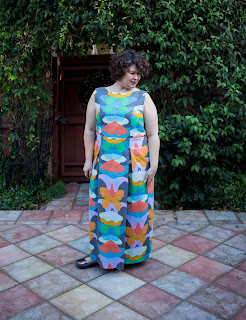
I chose to make two patterns for the blog tour. First up is the Marbella Dress. The Marbella Dress was the first pattern released by Kennis on October 8, 2014! It is a very classic silhouette and very versatile with two skirt options.  

It has pockets!

Both skirt options are knee length. As you may know - I'm not a fan for showing off my knees or legs. So I decided to make a maxi length Marbella Dress.


The pattern comes in cup sizes - which is especially handy for those that normally need to do an FBA. It has a wide boat neckline with the front and back both having a yoke with a seamed bodice. The Marbella Dress can be made lined or unlined and has an invisible back zipper. I am quite proud of my pattern matching of the back center seam. I have a sway back and should have done more of an adjustment than I did. I'll know better for my next one.


I used an Anna Maria Horner Ghost Wing in Dusk on a linen/cotton blend. I found this fabric at Super Textiles in the Dallas Fabric District for only $3/yard. This fabric is how I met Sharon (Sweet Mama Life - be sure to catch her blog today as well!). I'll have to share that story another day.


I bought about 8 yards of this fabric. I made curtains with it for my sewing room and the rest has been sitting on my shelf waiting for me to use it. When I decided to make the Marbella Dress, I knew this would be perfect.


I tried to very conscious of the design as I cut my pattern pieces and looking back, I wish I had done it a bit differently. I now wish I had tried to pattern match my front yoke with the center front panel and I wish I had done a solid grey for the side panels. I still love how my dress came out and I have a felling it will get lots of wear.


September in Texas us still very hot. Our average high temps don't get below 90 until mid October/ So I will have plenty of opportunities to wear my new dress. My arms often get cold when I am indoors at work and wanted something cute to wear on top - especially as we go into fall.


I've had the Salamanca Cropped Jacket on my "must sew" list since it released on March 7, 2016. It released concurrently with the Zamora Blouse which I tested. Back then, I was scared to try to test two patterns at the same time.


I've become quite fond of cropped jackets and I have been wanting a denim cropped jacket for some time. The Salamanca was perfect for this lightweight medium blue denim that I grabbed at the Dallas Fabric District. I tried my Salamanca on before I gave it one final press before doing the buttons and quickly decided that I loved it without buttons and didn't think I would ever wear it buttoned up.


I did remove 1.5" from the length of my Salamanca for my height.  I think I could have removed another 0.5" and might for my next one. One my maxi length Marbella, I gave it a bottom center slit to ease in movement - but I probably would have been fine without it.


The Salamanca is super comfortable and this denim will go with so many items in my closet.


The Salamanca is also lined. I used a pretty quilting cotton from my stash for the lining.


The construction of the Salamanca was so interesting and resulted in a perfectly finished item inside and out. It had me scratching my head at some points, but a few steps later I was mind boggled by the genius of it.  But all of Kennis's patterns are like that. I learn something new each time.


For today only the following patterns are on sale for 25% off with the code 920itsblogtour25

Visit our Sponsors and enter our Rafflecopter Giveaway for a chance to win one of 2 amazing prize packages:

Prize # 1
Itch to Stitch: 3 PDF patterns of choice
Raspberry Creek Fabrics: $100 Store Credit
D&H Fabrics Co: $50 Store Credit
Simply By Ti: Prize of $20 Store Credit
So Sew English Fabrics: Prize of $40 Store Credit
Sly Fox Fabrics: $25 Store Credit

Prize #2
Itch to Stitch: 3 PDF patterns of choice
Beautiful Textiles: $100 Store Credit
D&H Fabrics Co: $50 Store Credit
Surge Fabric Shop: $20 Store Credit
Knitpop: $50 Knitcoin Credit

Rafflecopter begins Monday September 16th and will close at 11:59pm ET Sunday, September 22nd. 2 winners (1 per prize package) will be drawn and announced Monday, September 23rd. Rafflecopter HTML: a Rafflecopter giveaway


Follow me on Instagram and Facebook!

Disclosure: This post may contain affiliate links. These links provide me with a small compensation if you make a purchase using my link. There is not cost to you when you do this. My thoughts and opinions given in this blog post are mine.

ITS Time to Sew Itch to Stitch Blog Tour 2018


Image may contain: text and indoor


I'm so excited to be a part of the ITS Time to Sew Blog Tour! For the Blog Tour, I decided to make a new to me pattern and an old favorite. Thanks to Simply by Ti and Sly Fox Fabrics for supplying me with fabric for the tour.

I love doing blog tours. They force me to commit to sew something on a deadline. For some reason, I do better with a looming deadline. I bought the Mountain View Pull-on Jeans when they released it big plans to make a million pairs as they looked just like my beloved Jag Jeans. I live in pull-on pants! But life and other commitments (pattern tests and blog tours) kept me from making a pair. I even bought stretch denim months ago to make some with. So when I signed up for this blog tour - I knew I had to finally make the Mountain View Pull-on Jeans! Nothing like a deadline to make it happen! And I was working on a shorter timeline as I'm on vacation somewhere in the Gulf of Mexico on a cruise to the Panama Canal as you read this! So if you leave me any comments, I won't see them for awhile. Both Patterns I made are on sale today for $8.


I received some fabulous stretch twill from Simply by Ti in Burgundy and Fuchsia. I ran out of time to make a pair of Mountain View Pull-on Jeans with the Fuchsia - Sorry Ti!


These pants fit so great! I made a muslin with some really wild and very retro stretch woven to see if I needed any fit adjustments and there were no adjustments needed! Yay for small miracles! My muslin pair fit great and my husband said he liked them! I plan to go ahead and finish them and wear them - so be on the lookout for them. I did adjust the length to be 29" inseam for a finished inseam of 28".


Now that I made the Mountain View Pull-on Jeans, I'm so mad at myself for not making them sooner! Seriously - they fit great and feel so good on. The front pockets are the perfect size. Big enough to hold stuff, but not so big that they bunch up.


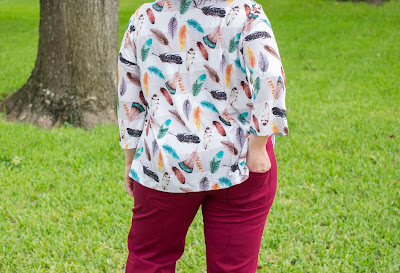
I put the back pockets where the pattern piece had them, but they feel a little low on my behind. I'll try to play with pocket placement on my next pair. My muslin pair was made without pockets and without the faux fly - so I probably should have at least taken the time to play with pocket placement on them. Lesson learned.


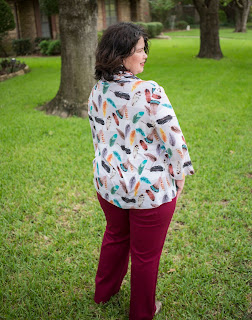
This Burgundy stretch twill is just amazing. It's a gorgeous rich color that will be worn so much this fall. The stretch twill has great stretch and recovery. I've made pants with the Simply by Ti Navy and Olive (no longer in stock) stretch twill and they are in constant rotation in my wardrobe.  I now need to grab the Cinnamon and Teal colors next! I kept wanting to type "pants" instead of "jeans" every time I types Mountain View Pull-on Jeans because, I intentionally tries to  make mine look more like "pants" than "jeans" so that I can wear them to work and not be looked at in a "why are you wearing jeans to work?" way. So no rivets or fun pocket design on my "pants".


I then needed a beautiful new top to wear with my Mountain View Pull-on Jeans. I received the prettiest bamboo spandex from Sly Fox Fabrics. I had good intentions to make another Itch to Stitch pattern that I haven't tried yet, but I was worried about having time to make a muslin and then a final piece for my blog. So I went to one of my favorite Itch to Stitch patterns - the Bellavista. I tested the Bellavista and you can see all the beautiful versions I made HERE.


This fabric from Sly Fox Fabrics is from their Bohemian Soul RVJ line. RVJ stands for Rayon Viscose Jersey. It's so soft and has incredible stretch. The Bellavista is perfect for drapey and stretchy fabric like this.


This print is named Sahara Breeze. It has a beautiful white and soft grey striped background behind a flurry of colorful feathers. The stripes are delicate and not extremely visible in my photos - just as they are in real life.


I make the Bellavista per the pattern - except for the sleeves. I removed 1.5" from the sleeve length for my height, but did not remove length from the body as I like it this length.


One little thing I did do different on this Bellavista was to make it a tiny bit swingy-er. The Bellavista already has a flowy body, but I added a few inches to the swing as I had adequate fabric to do so and figured I'd use as much of my fabric as possible. Cutting the pattern pieces as is wouldn't have left any usable scraps anyways, so I might as well give my top some extra width.


My favorite thing about the Bellavista is the huge cowl! It's perfectly shaped to give that big dramatic drape that I love, yet the neckline is actually higher on my chest and I don't flash anyone when I bend over. The Bellavista does include a neckband if you wanted to make one without the cowl - but I've never done it.


I love my new outfit and can't wait to wear it to work. I know both of these pieces will get a whole lot of wear over the next few months.

Here's a schedule of all the bloggers participating. Do them a favor and try to check out their posts by clicking on the graphic below.


Be sure to visit all the wonderful sponsors for the ITS Time to Sew Blog Tour 2018!


Last, but not least - be sure to enter to win one of the amazing prizes provided by our generous Sponsors!

a Rafflecopter giveaway

Follow me on Instagram and Facebook!

Disclosure: This post may contain affiliate links. These links provide me with a small compensation if you make a purchase using my link. There is not cost to you when you do this. My thoughts and opinions given in this blog post are mine.