Showing posts with label beginner pattern. Show all posts

Hearth + Home Quilt Pattern by The Seasoned Homemaker

I recently tested the Hearth + Home Pattern for The Seasoned Homemaker. This pattern is 2 quilts in one. Both quilts are made using the same blocks and layout, there's just a variation in the fabric placement of the 9 patch blocks. I tested the Home version which is described as having a vintage feel and made a scrappy version. The Hearth version has a star like design with more negative space.


This has been a record setting summer in Dallas, Texas. The nonstop 100+ degree days have had me longing for the cooler temps of autumn. I have made a lot of brightly colored quilts this year and thought it would be nice to make one with a fall inspired color palette. 


I had fun digging through my fabric bins for fat quarters and remnants in shades of teal, gold, and maroon (I really wanted purple like eggplant, but couldn't find enough fabrics in this color in my scraps). I found so many fun prints and blenders and it was fun to mix and match them into the 9 patch squares. For the snowball blocks, I went to my cart of precut scraps and pulled out the colors I needed in the size needed for these blocks. It was such a timesaver having my scraps precut into common sized squares and strips.


For the background fabric and borders I went through my remnants that are less than a yard in size. I used two different shades of brown for the background fabric. For the borders I used two fabric leftover from projects I sewed for Jaftex. 


My quilt features scraps from  previous projects, random fat quarters and scraps that I've acquired from swaps and secondhand. In addition to the two different quilts that can be made from the pattern, there will also be a tutorial that provides instructions to make blocks and a small quilt with the trimmings of the snowball blocks. 


I loved how quick and easy the Hearth + Home Pattern was. I give it bonus points for being scrap friendly. I really want to make the Hearth version as well - and also make it scrappy.  Below is a graphic of both versions.

There's a discount code available when you sign up for emails from The Seasoned Homemaker.


Follow me on Instagram and Facebook!


Winter Wear Designs Traveler Tee

I love Winter Wear Designs patterns, but I always seem to miss the cut off on Suzanne's tester calls. I think she felt sorry for me this time, because she told me she'd make room for me! I was thrilled as I was head over heels in love with the line drawing she had posted of the Traveler Tee.


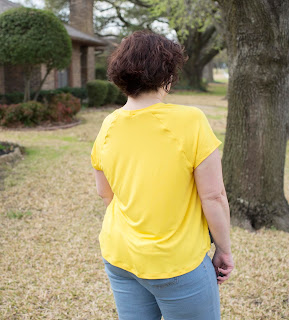
I am a sucker for patterns that allow me to mix wovens and knits together. This is mainly because I tend to save scraps and have a tendency to pick up amazing remnants in the fabric district that are not big enough for an entire project. I used a mauve poly jersey and a rayon woven (if you recognize it, I've used it for 2 different tops,  both of which are Winter Wear patterns).


The Traveler Tee above was the first one I made and I made a size too big! My bust is 37.5" and the size large stated 38" and I figured my bust was closer to the large than the medium. Suzanne pointed out my mistake, but it was too late - I had already cut out another one. See below.


I used a poly jersey and a satin-y woven for this Traveler Tee. Both the one above and this one I made the cap sleeved version. To get a perfect corner, you must follow the instructions exactly! I love to add a strip of interfacing to my knit piece to prevent it from stretching as I sew it to the woven bodice.


Before I sewed up the Traveler Tee above, I cut out the Medium and sewed both at the same time. I decided to use the same satin-y woven I used above for this Traveler Tee. But this time I used a different portion. It gives it a totally different look. This time I paired it with a brushed nylon knit from Zenith & Quasar.


I removed 2" from the length of all the Traveler Tees I made. As you can see, the medium is significantly shorter on me than the large ones above.


This one is also a cap sleeve and has the longer back.


The pattern got a final tweak - although no changes were made to the size medium, I still printed it out and made another Traveler Tee.


I made this Traveler Tee with a rayon spandex knit and a cotton voile. This one is the short sleeved version with the straight hem in the back.


The pattern includes an elbow length, 3/4 length, and long sleeve option in addition to cap sleeve and short sleeve. If we were not entering Spring and Summer, I would have made a flannel and sweater knit version with long sleeves. I'm putting it on my fall sewing list now!


I really love the fit of the Traveler Tee and have already worn 2 of the tops I made. I'm debating on trying to take in the large ones or give them to my mother. I did wear the first large one and loved how it felt on. The only problem with it is that the armholes are a bit big and you can see my bra when I lift my arm. I will definitely be making more of these not only for this summer, but I will make a few for this fall & winter.

The Traveler Tee is part of the Winter Wear Wardrobe Builders Collection. All patterns in this collection are $5! They are all great basics that are beginner or adventurous beginner friendly.

Follow me on Instagram and Facebook!

Disclosure: This post may contain affiliate links. These links provide me with a small compensation if you make a purchase using my link. There is not cost to you when you do this. My thoughts and opinions given in this blog post are mine.

Ellie & Mac Sunny Day Dress

It's Wacky Wednesday at Ellie & Mac! Every Wednesday 6 patterns are marked down to only $1! This week I'm showing off the Sunny Day Tunic & Dress pattern.


And yes, I did make the dress version!


I really do love maxi length dresses and do find that I wear them often in the summer.


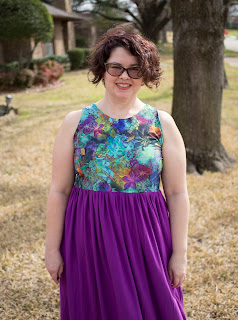
The Sunny Day Tunic & Dress is a super quick sew with only 1 pattern piece. The front and back bodice pieces are the same. The bodice is lined and the skirt is a rectangle that you are given the dimensions for.


For my Sunny Dress, I used fabrics from Zenith & Quasar. The bodice is a plush brushed poly in the Secret Garden print.


The skirt is a brushed nylon that is so soft. I just love the feel of the brushed nylon on my legs.


Be sure to check out all the patterns in the Wacky Wednesday sale HERE!


Follow me on Instagram and Facebook!

Disclosure: This post may contain affiliate links. These links provide me with a small compensation if you make a purchase using my link. There is not cost to you when you do this. My thoughts and opinions given in this blog post are mine.

George + Ginger Slash Tunic

It's been awhile since I made a George + Ginger Slash Tunic, so what better time than now. The Slash Tunic is best when made with heavier and stiffer knits like liverpool and scuba. These types of knits tend to be hot so I love them for fall and winter wear.


I've had this Nicole Miller scuba knit from Jo-Ann's in my stash for a long time. The print was called Boho Patch Multi.


I really love that with a busy print like this, the princess seams seem to disappear.


I just love the slash hem on the Slash Tunic. It allows for the leg to peak through as you walk and move, but it stays closed when standing. You can make the slash openings as daring or modest as you like. I prefer them to open beginning at my high hip to ensure I don't flash and flesh.


The Slash Tunic comes in tunic, mid, and long lengths. This is the mid length.


It also has three sleeve options; short, 3/4, and long. These are the 3/4 length sleeves.


The back has a center seam with shaping to prevent pooling at the lower back and to also allow for sway back adjustments. The back lays nice and flat, I'm just standing wonky in the photo.


The Slash Tunic is a great piece to wear over leggings or skinny leg pants. I keep saying that I'm going to make a few in solid colors to wear with leggings, but the funky bold prints always grab my attention first. If you are interested, the link to my first blog on the Slash Tunic can be found HERE.

Follow me on Instagram and Facebook!

Disclosure: This post may contain affiliate links. These links provide me with a small compensation if you make a purchase using my link. There is not cost to you when you do this. My thoughts and opinions given in this blog post are mine.

5 out of 4 Mabel Ruffle Cowl

I recently had the pleasure to test the Mabel Ruffle Cowl for 5 out of 4 Patterns. I love cowl neck tops and I really love tops that are swingy as they help to disguise my swollen belly caused by autoimmune gastritis. The Mabel Ruffle Cowl has both of these things and the top is pure love.


The Mabel features a high - low hem that can be made with or without a ruffle.


To prevent the Mabel from looking frumpy, you will need to make sure you make it the proper length. You want the ruffle in the front to start about the belly button and in the back, it should start mid to upper butt.


 I'm 5' tall and removed 3" from the length and the back ruffle starts about mid butt on me.


The Mabel can be made with or without the cowl. It's important to make the Mabel with a drapey knit so that the cowl is not too bulky and the top can drape beautifully.


The Mabel has short, 3/4, and long sleeve options. I removed 2" from the sleeve length and cut at the 3/4 length sleeve cut line and I ended up with almost long sleeves. My sleeves are not hemmed in these photos. I folded my sleeves up to a 3/4 length for these photos.


I wanted long sleeves initially, but had run out of fabric for long sleeves. So after I took these photos, I added a cuff to my sleeves to keep them long. 


 Below is a photo of the first Mabel that I made. This Mabel is too long on me and looked extremely unflattering from the back. I'm trying to decide what I want to do with this Mabel - 1) take the ruffle off and just hem it; 2) take the ruffle off then remove 3" from the top and reattach the ruffle; or 3) give it to my mother. I'm leaning towards option 1 or 3 and 2 sounds like more work than I want to do.


 The Mabel comes in Womens and Kids sizes. My friend Sharon (Sweet Mama Life) also tested the Mabel in the Womens and Kids sizes. The patterns are on sale for $7.95 each. Buy the Womens and Kids and get an additional $2 off!


Sharon and I met up at the Dallas Fabric District to shop and we both wore our Mabel's so we could get photos together. Well, someone forgot to bring a memory card for her camera and wasn't able to take any photos. Oops.

The Womens and Kids Mabel is on sale through November 11th.

Follow me on Instagram and Facebook!

Disclosure: This post may contain affiliate links. These links provide me with a small compensation if you make a purchase using my link. There is not cost to you when you do this. My thoughts and opinions given in this blog post are mine.

Halla Patterns Women's Sunny Day Top & Dress

The newest Halla Pattern is my favorite thing to wear right now. It's the Sunny Day Top & Dress for Women. The girls version has been around for awhile and everyone has been asking for an adult version and Samantha finally made it! I loved it so much that I made 5 during testing. I'll show you the three I made "per the pattern". Later, I'll make a new blog post to show you my hacks.


First off, the Sunny Day has a shirt length, tunic length, and two dress lengths. I made the shirt length on all 3. I made this one with the cutest fox bamboo spandex jersey from Nature's Fabrics.


If you didn't notice, the Sunny Day has a stylish split yoke. There's an option to add a trendy pussy bow to the neckline, string ties, or you can even add a hook & eye closure if you want.


The yoke if perfect for using those beautiful woven scraps that you just can't bear to part with. I used a remnant of a beautiful Ivy Jane print that I got at the Dallas Fabric District for the yoke on this top. The remnant was barely big enough to cut the yoke from. It was one of those fabrics that I bought with no good reason other than I thought it was too beautiful to leave behind. I'm so happy to be able to put it into a top that I'll wear over and over again.


The body of this Sunny Day is made with Dark Jade Rayon Spandex from Made Whimsy.


The Sunny Day has two sleeve styles (puff or fitted), each with 3 length  options (short, 3/4, and long), and 3 different ways to finish the sleeve (hemmed, elastic, or banded). I used the 3/4 length puff sleeve for this top and the foxy top. On this top I finished the sleeves with elastic. The foxy one has bands.


In addition, the Sunny Day has two hem options - curved or straight. I chose straight for the one below and curved for this jade and the foxy versions.


This top was my "toile" that I made with some poly jersey knits I had picked up at the Fabric district. I wanted to use something that I liked, but wouldn't be in tears if it looked horrible. I really loved it from the moment I tried it on for "fit" photos and was wishing I had been more careful with my pattern placement and lining up the design at the side seams. But I'll still wear this alot.


This is the long sleeve with a band. And below is the only photo I have that kinda shows the back. I really love that I can make the Sunny Day with a print and a solid and it still looks like a cohesive piece and not like I just ran out of fabric.


Speaking of fabric requirements - I found that I could make the 3/4 length sleeve version of the Sunny Day with 1 yard of 60" wide knit if I'm careful with my cutting layout. But - please not that I am 5' tall and my 3/4 length sleeves are shorter than the pattern by about 2". The length of my shirt is also about 2" shorter than the pattern.

The pattern is on sale through September 9th. Get 20% off all PDF patterns in your cart with the code SUNNYDAY at checkout. Buy it HERE!

Stay tuned for my Sunny Day hacks!

Follow me on Instagram and Facebook!

Disclosure: This post may contain affiliate links. These links provide me with a small compensation if you make a purchase using my link. There is not cost to you when you do this. My thoughts and opinions given in this blog post are mine.

Ellie & Mac Be Confident Update!

I love a good tunic, because I tend to wear leggings whenever I'm working from home and on the weekends. I especially love wearing tunic that have a high-low hemline. I love the shorter front to show off more of the fun print of my leggings, but enjoy the extra coverage on my rear (where I need it). I was excited to hear that the Ellie & Mac Be Confident pattern was being updated and signed up immediately to test the revisions.


I compared my original Be Confident pattern pieces to the newly revised pieces. I found that the shape of the high-low skirt had been modified. It now has a more gentle slope from the front to the back.


The length of the tunic length skirt was not changed much - it is just a tiny bit shorter. I'm 5' tall and did not remove any length from the skirt. I did remove length from the bodice.


The Be Confident does have a full circle skirt. Which means it is perfect for doing some twirling!


As an adult, I think we forgot how fun it can be to let loose and go for a spin.


I forgot how dizzying it could be.


The bodice of the Be Confident was slimmed down for an improved fit. I made the Be Confident last year and had been disappointed in the fit as the bodice was extremely loose. Now - the fit is just perfect.


The bodice is intended to end at your natural waist. I'm 5' tall and I removed 2.5" in length from the bodice. I recommend measuring yourself to determine if you need to shorten or lengthen the bodice.


I used a slinky lightweight knit for this Be Confident and the wind was able to blow my skirt around.


I'm wearing leggings I made with this fun blue plaid plush brushed poly from Zenith & Quasar Fabrics.


There was one revision made to the pattern after I made this version. The revision narrowed the shoulders by 0.5 inches. If you notice in my photos, the edges of the shoulder go out and slightly over the edge of my shoulder.

If you already own the Be Confident, you will get an email with the updated pattern. If you don't already own it, now's a great time to buy it at the price of $3.85. In addition, there is a site-wide back to school sale. All patterns are 40% off - no code needed! Shop all patterns HERE!

Follow me on Instagram and Facebook!

And here's a few photos of an earlier version I made. This was the looser fit bodice.


Disclosure: This post may contain affiliate links. These links provide me with a small compensation if you make a purchase using my link. There is not cost to you when you do this. My thoughts and opinions given in this blog post are mine.