Showing posts with label easy sewing pattern. Show all posts

Ellie & Mac Autumn Spice Top

It's Wacky Wednesday at Ellie & Mac. Six patterns are discounted to only $1 through midnight on January 23. This week, I'm featuring the Autumn Spice Top.


The Autumn Spice Top is a relaxed fit top with multiple color blocking options - perfect for using up scraps. I'm wearing a heart monitor this month and completely forgot I had it on when I took these photos. I've been taking it off or at least tucking it into my bra for photos, but completely forgot about it.


I removed 2" from the length of the pattern for my 5' height. The length is only removed from the center color blocking piece. I think I will remove an additional inch when I make my next Autumn Spice Top.


I used scraps from my stash to make my Autumn Spice Top. The top section is a poly jersey, the middle is athletic brushed poly from Zenith & Quasar, and the bottom is rayon spandex.


I absolutely love the fit of the Autumn Spice Top and will definitely be making more. The pattern has two variations for the top color blocking piece. There is an above the bust (which I used) and a below the bust.


It's also possible to join sections together to only have two sections to color block. The Autumn Spice Top pattern also has short and 3/4 length sleeve options for limitless possibilities.


Be sure to check out all the patterns on sale for Wacky Wednesday HERE!

Follow me on Instagram and Facebook!

Disclosure: This post may contain affiliate links. These links provide me with a small compensation if you make a purchase using my link. There is not cost to you when you do this. My thoughts and opinions given in this blog post are mine.

George & Ginger Drama Dress - Tunic Hack

I made my first Drama Dress from George + Ginger earlier this year when I was headed to NYC to see G + G hit the Fashion Week Runway. I decided it was time to make another. I don't wear dresses, so I decided to hack the Drama Dress into a fun tunic.


All I did was take three inches off the length before hemming. I cut this Drama Dress out per the pattern. But when I tried it on, I just didn't like the length on me with leggings.


I completely eyeballed cutting straight off the bottom on my cutting table. I'm pretty sure it's not perfect, but I love it.


The Drama Dress has the option to add a bow tie. I cut the bow tie out, but decided I wanted to keep it separate.


Here is my Drama Dress sans necktie. My intention was to take photos of this Drama Dress being worn with some mustard jeggings. I had a few minutes to take photos after work one evening and liked how it looked with these pants - so I left them on. However, I forgot to change into brown shoes.


 I made this Drama Dress with 3/4 length sleeves and think it will be perfect to wear into the early spring.


I love the loose and swingy fit of my hacked Drama Dress. I think I may make a few more, but I'll take the time to actually remove the length from my pattern pieces first.


The Drama Dress comes with a ton of options. There are multiple necklines including a collared version and a really cute keyhole neckline. It also has optional pockets!

Follow me on Instagram and Facebook!

Disclosure: This post may contain affiliate links. These links provide me with a small compensation if you make a purchase using my link. There is not cost to you when you do this. My thoughts and opinions given in this blog post are mine.

Halla Patterns Mirra Raglan

Halla Patterns has a new pattern out and it's the Mirra Raglan with a ton of options!


In testing I made the plainest Mirra Raglan possible. No pockets or other fun features.


But I did use fun fabric! How cute are these kitties in boxes?


The Mirra Raglan is a semi fitted top. I tend to prefer a slightly looser fit to help hide by belly. I already have plans to make a few Mirra Raglans with the cowl and making them about 2 sizes bigger for a slouchy fit.


I love the neckline on the Mirra Raglan. It's got a boatneck like shape that I really love.


When I cut out the Mirra Raglan, I forgot to take length out for my height and ended up cutting 3" off the bottom before I hemmed it.


All Halla pdf patterns are on sale for 40% off with the code HOLIDAY. Click HERE to have the discount automatically added.

Image may contain: text

Follow me on Instagram and Facebook!

Disclosure: This post may contain affiliate links. These links provide me with a small compensation if you make a purchase using my link. There is not cost to you when you do this. My thoughts and opinions given in this blog post are mine.

George +Ginger Ginger Dress Hack - Shirt Length

Remember my George + Ginger Ginger Dress that I posted recently? Well, I said in my blog that I had a shirt hack, this is it! You can read the original blog post HERE!

When the Ginger Dress was being updated, I was a very naughty tester. Instead of sewing up my tester version first, I sewed up a hack instead.  The lengthen/shorten lines on the Ginger Dress are a bit different than most patterns as you have to take length off going both ways. I decided to see what would happen if I just cut my pattern at the shorten line and do nothing else. Here's a crappy webcam shot I took of it on without the band added. It's super cute just like this!


So, I didn't want to leave the Ginger Dress like that, and felt like it would have been too short hemmed - but maybe not. So I went ahead and added the bands. I think it's still super cute like this as well, but feel like it's more of a tunic length.


Either way, I think it's cute with my skinny jeans and I've worn it a few times already.  I'm thinking about making another Ginger Dress and maybe doing the bands about half the height they are or even leaving it off.


So, if dresses are not your "thing" either, this is a cute option to try.


Today is the last day of the Anniversary Sale. Get 25% off all patterns with the code YEARTHREE.

Follow me on Instagram and Facebook!

Disclosure: This post may contain affiliate links. These links provide me with a small compensation if you make a purchase using my link. There is not cost to you when you do this. My thoughts and opinions given in this blog post are mine.

George + Ginger Slash Tunic

It's been awhile since I made a George + Ginger Slash Tunic, so what better time than now. The Slash Tunic is best when made with heavier and stiffer knits like liverpool and scuba. These types of knits tend to be hot so I love them for fall and winter wear.


I've had this Nicole Miller scuba knit from Jo-Ann's in my stash for a long time. The print was called Boho Patch Multi.


I really love that with a busy print like this, the princess seams seem to disappear.


I just love the slash hem on the Slash Tunic. It allows for the leg to peak through as you walk and move, but it stays closed when standing. You can make the slash openings as daring or modest as you like. I prefer them to open beginning at my high hip to ensure I don't flash and flesh.


The Slash Tunic comes in tunic, mid, and long lengths. This is the mid length.


It also has three sleeve options; short, 3/4, and long. These are the 3/4 length sleeves.


The back has a center seam with shaping to prevent pooling at the lower back and to also allow for sway back adjustments. The back lays nice and flat, I'm just standing wonky in the photo.


The Slash Tunic is a great piece to wear over leggings or skinny leg pants. I keep saying that I'm going to make a few in solid colors to wear with leggings, but the funky bold prints always grab my attention first. If you are interested, the link to my first blog on the Slash Tunic can be found HERE.

Follow me on Instagram and Facebook!

Disclosure: This post may contain affiliate links. These links provide me with a small compensation if you make a purchase using my link. There is not cost to you when you do this. My thoughts and opinions given in this blog post are mine.

Friday Feature Freebie Sewing Patterns

I recently sewed up two free patterns that I think are pretty great. I love free patterns and know everyone else does too - especially when they end up being pretty great. So I think I'll try to do a featured freebie one friday a month. How does that sound? For this first installment you get 2 freebies!

First up is the Greenstyle Creations Green Tee. This pattern is free with a code from the Facebook Group. You can then find the code in the Announcements HERE. The pattern comes with a v-neck and a scoop neck option and only includes short sleeves. However, there is a free long sleeve add-on that can be found HERE.


I ended up with very few photos in focus - so these two are all you get to see. Plus, I need to grade out a little more for my belly and hips next time. I'm sucking in big time in that photo above. I made this Green Tee with a blue wood gain athletic brushed poly from Zenith & Quasar. I'll be making a long sleeved Green Tee soon. 


 Next is the Patterns for Pirates Tulip Tee. This is free on the website - no code needed. There's also a kids version - also free. The Tulip Tee pdf pattern does not include the cowl I added below. But - the information to add a cowl like this is found on the Patterns for Pirates Blog HERE. The Tulip Tee also includes a nursing friendly underlayer option as well.


I did not have the add-on pack that the Patterns for Pirates Blog refers to for the cowl, but I just drafted my own. I measured the neckline and cut a rectangle that was the width of the neckline and 10" tall. 


I made this Tulip Tee with a lightweight sweater knit I bought at Wherehouse Fabrics from the remnant table. I threw it on over my Green Tee. You can see a lit of the blue Green Tee peeking out.


The Tulip Tee has a slightly curved hem in the back. I highly recommend ironing the hem before topstitching it. You hem the entire top in one fell swoop and ironing first will make it much easier to ensure you get an even hem all the way around.


I love this top more than I had thought I would. I did take a bit of length out of the Tulip Tee for my height and redrew the tulip front to account for the removal.


Grab both of these Freebies and try them for yourself. I think you will love them too.

Follow me on Instagram and Facebook!

Disclosure: This post may contain affiliate links. These links provide me with a small compensation if you make a purchase using my link. There is not cost to you when you do this. My thoughts and opinions given in this blog post are mine.

5 out of 4 Mabel Ruffle Cowl

I recently had the pleasure to test the Mabel Ruffle Cowl for 
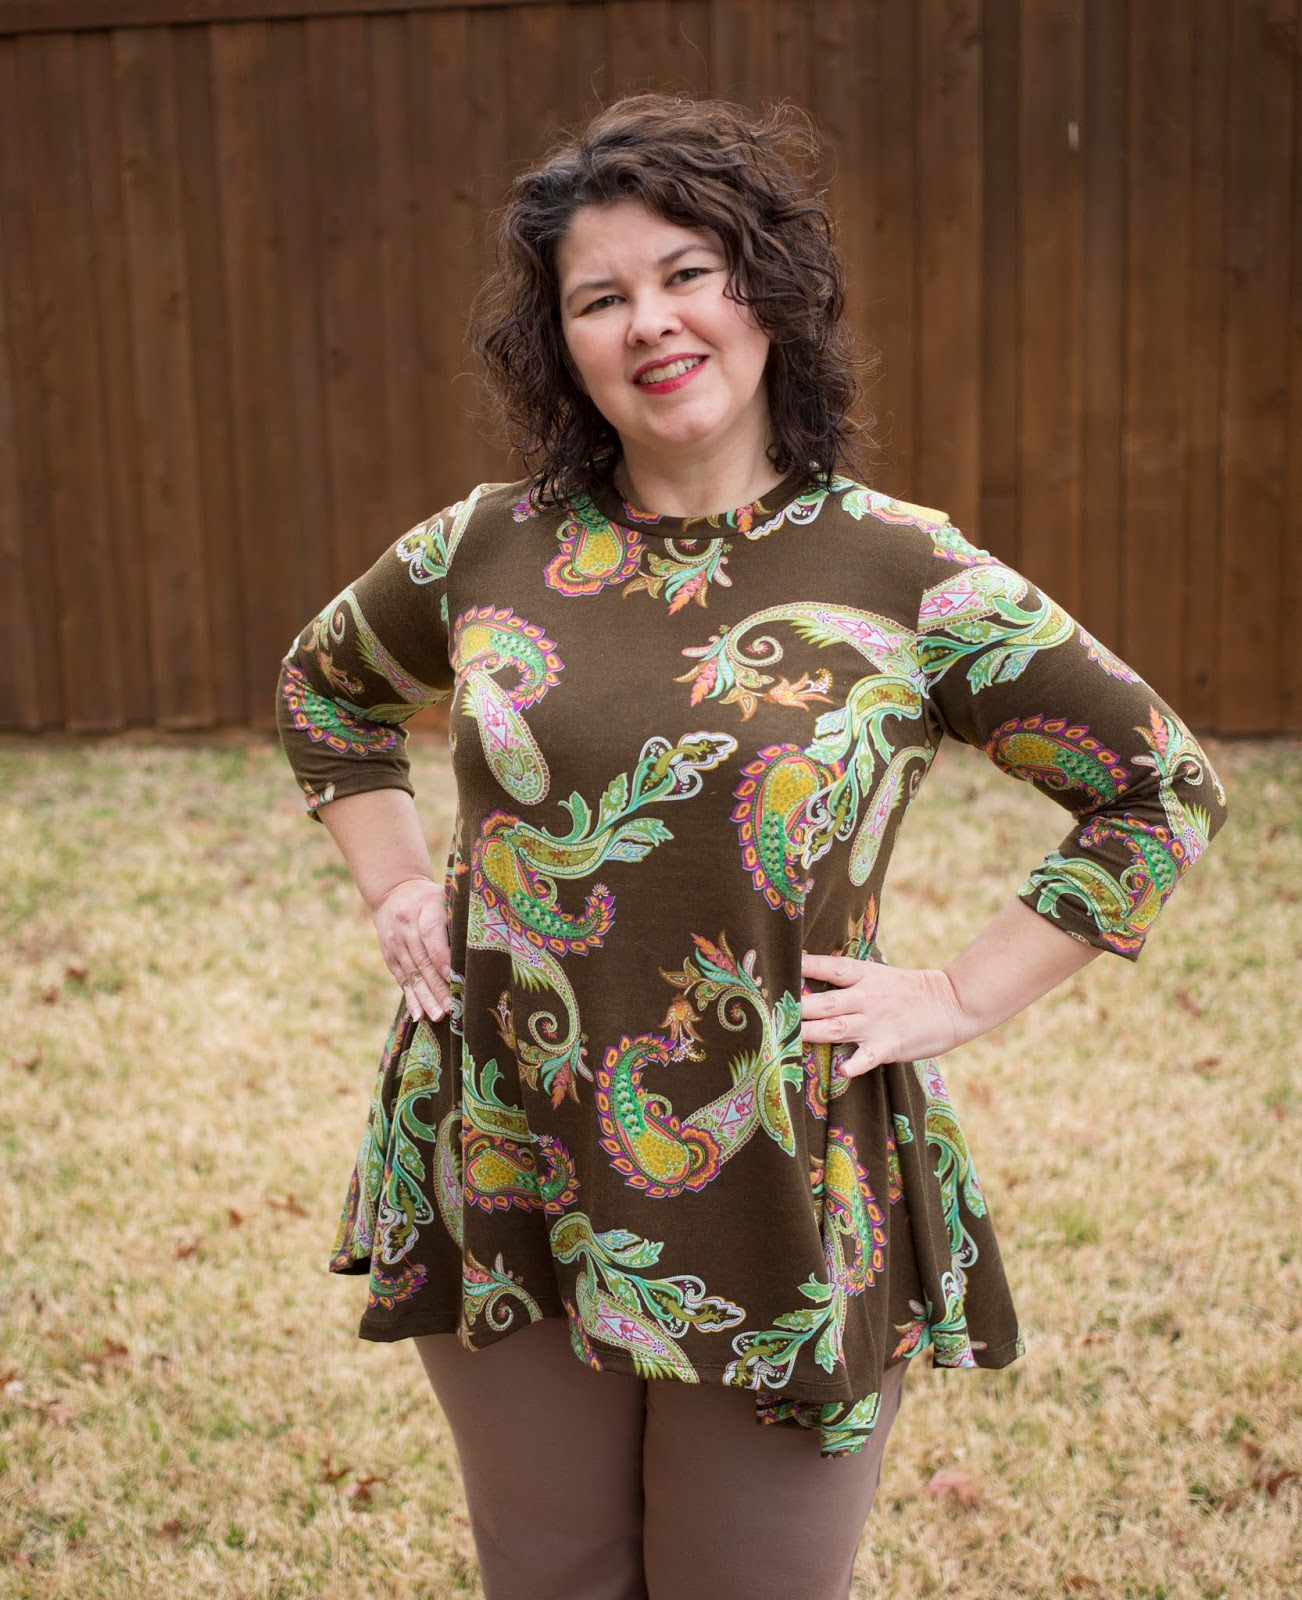
5 out of 4 Patterns. I love cowl neck tops and I really love tops that are swingy as they help to disguise my swollen belly caused by autoimmune gastritis. The Mabel Ruffle Cowl has both of these things and the top is pure love.


The Mabel features a high - low hem that can be made with or without a ruffle.


To prevent the Mabel from looking frumpy, you will need to make sure you make it the proper length. You want the ruffle in the front to start about the belly button and in the back, it should start mid to upper butt.


 I'm 5' tall and removed 3" from the length and the back ruffle starts about mid butt on me.


The Mabel can be made with or without the cowl. It's important to make the Mabel with a drapey knit so that the cowl is not too bulky and the top can drape beautifully.


The Mabel has short, 3/4, and long sleeve options. I removed 2" from the sleeve length and cut at the 3/4 length sleeve cut line and I ended up with almost long sleeves. My sleeves are not hemmed in these photos. I folded my sleeves up to a 3/4 length for these photos.


I wanted long sleeves initially, but had run out of fabric for long sleeves. So after I took these photos, I added a cuff to my sleeves to keep them long. 


 Below is a photo of the first Mabel that I made. This Mabel is too long on me and looked extremely unflattering from the back. I'm trying to decide what I want to do with this Mabel - 1) take the ruffle off and just hem it; 2) take the ruffle off then remove 3" from the top and reattach the ruffle; or 3) give it to my mother. I'm leaning towards option 1 or 3 and 2 sounds like more work than I want to do.


 The Mabel comes in Womens and Kids sizes. My friend Sharon (Sweet Mama Life) also tested the Mabel in the Womens and Kids sizes. The patterns are on sale for $7.95 each. Buy the Womens and Kids and get an additional $2 off!


Sharon and I met up at the Dallas Fabric District to shop and we both wore our Mabel's so we could get photos together. Well, someone forgot to bring a memory card for her camera and wasn't able to take any photos. Oops.

The Womens and Kids Mabel is on sale through November 11th.

Follow me on Instagram and Facebook!

Disclosure: This post may contain affiliate links. These links provide me with a small compensation if you make a purchase using my link. There is not cost to you when you do this. My thoughts and opinions given in this blog post are mine.

Halla Patterns Autumn Sweater for Women

Halla Patterns has a new pattern out and like all Halla Patterns, it has more options than you will ever need.  The Autumn Sweater is a hoodie, a top, a cardigan, and more! Take a look at some of the options.


I made the cocoon cardigan option.


I used a fun vintage sewing machine double brushed poly from So Sew English for my first Autumn Sweater.


I removed 2" from the length of the body for my 5' height. When removing length from this pattern (or adding) remember to remove (or add) the same amount of length to the front bands.


The cocoon cardigan option to the Autumn Sweater is perfect for layering. The dolman sleeves ensure there is enough ease under the arms to allow for layering and you also don't get bulk at your shoulder seams.


I also graded the pattern to be one size larger in my hips. I cut the bottom of the back piece to be one size larger. If you do this, be sure to cut the back band for the size that the hemline is.


Of course I couldn't just make one Autumn Sweater. I've been wanting to make a grey sweater knit cardigan as I feel like it will get a lot of wear.


I have had this grey sweater knit in my stash for awhile. I got it from Sincerely Rylee in a sweater knit box.


The sweater knit was very loose weave and seemed to grow more and more as I sewed it. You can definitely tell from my sleeve cuffs. A wash & dry helped it shrink back up - but it's looser than intended. It is advisable to size down one size when using a loose weave sweater knit like this.


This pattern calls for knit fabrics with at least 50% stretch. I'd recommend using fabrics with some drape to prevent a boxy look. Rib knit works great for the bands.


The Autumn Sweater has several sleeve options. For the long sleeves there is a fitted and a relaxed option. In addition, a 3/4 length kimono style sleeve is also included.


Since testing, I've made two more Autumn Sweaters in the cocoon cardigan version, with one more cut out and ready to sew. I'll be sharing photos of these later this month. I'm sure I'll be trying all the other options very soon.


The Autumn Sweater is on sale through November 7th. In addition, get 20% off all pdf patterns (including the Autumn Sweater) with the code AUTUMN through November 7th.

Follow me on Instagram and Facebook!

Disclosure: This post may contain affiliate links. These links provide me with a small compensation if you make a purchase using my link. There is not cost to you when you do this. My thoughts and opinions given in this blog post are mine.