Showing posts with label pattern test. Show all posts

Diagonal Dazzle Quilt Pattern by Mix Measure Make

I recently finished testing the Diagonal Dazzle Quilt by Danielle of Mix Measure Make. I'm not going to lie - this quilt took me a long time to make, but it was so worth it. Just look at all those tiny squares! They are 1" finished and there are hundreds of them to make.  I also decided to make a scrappy version of the quilt. The quilt requires three colors plus a background fabric. 


I was given  a large amount of fabric scraps from a member of our local sewing group on Facebook. She  had an etsy shop at one time and cut her items in batches from the fabric folded in half which left a long strip down the middle of the yardage that was about 10" wide. One fabric that was in large abundance was a white fabric with a black space print. I decided to use it as my background. I probably have enough of this fabric for 2 more quilts. 


I then needed to pick my colors. This took me a bit and after playing with fabrics for a day I decided on a royal blue, a turquoise/mint green, and purple. 


I was particular with which fabrics I selected for my blue and turquoise/mint colors. For blue, I tried to stay as close as possible as I could to a royal blue and included blues with  green in the print. For the Turquoise/mint colors I kept to a few fabrics which some all came from  the same collection. I did allow them to range from a pale mint with a white print to a dark turquoise. I find that adding in different tones in  the same color family adds depth and interest.


When it came to the color purple, I had to dig to find enough fabric scraps that were even close to being purple-ish. I added  in some more pinkish purples and some prints that were equal parts blue and purple. I also had a print that  was purple based, but had bits of red and brown in the print. 


I absolutely love how my Diagonal Dazzle Quilt turned out! As my scraps were cut into the quilt pieces, I was extremely worried that my quilt was going to turn out hideous. As I slowly pieced together the units, I really loved how the colors played together and embraced the variety of the purples. All my fears evaporated when I took my completed top outside to get a photo and loved how bright and playful it turned out. 


The Diagonal Dazzle Quilt comes with two different sets of instructions. There's one set that I followed that uses less fabric. It uses zero waste techniques such as 4 at a time flying geese and making 2 half square triangles at a time. This method does require trimming pieces and blocks as you go. The second method creates two quilts! It uses more fabric and uses zero waste techniques, but you make flying geese and half square triangle individually, but sew a second line of stitches to make a bonus half square triangle. After you make the Diagonal Dazzle Quilt like mine above, you can them make a second smaller quilt with the bonus blocks. 

This is Danielle's first quilt pattern and I was so impressed with the instructions and all the sewing tips and tricks in the pattern. It's on sale for a limited time for the release. 

Follow me on Instagram and Facebook!

Disclosure: This post may contain affiliate links. These links provide me with a small compensation if you make a purchase using my link. There is not cost to you when you do this. My thoughts and opinions given in this blog post are mine.

Sinclair Patterns Nova Raglan

Sinclair Patterns are amazing! Each pattern comes in petite, average, and tall sizing. It's so nice to be able to print a pattern and not have to make adjustments for my height! Their newest pattern is the Nova Raglan. The Nova Raglan is a relaxed fit and has a couple of options that make it the perfect cold weather raglan.


For this version, I made the drawstring  hem and did the neckband.


I used cotton lycra for this Nova. The mustard is a solid cotton lycra from Made Whimsy and the Goldfish & Waterlily print is from Jumping June Textiles.


For my next Nova, I decided to try a few other options. I used the cowl and did a band for the hem.


I used Mud Pie Athletic Brushed Poly from Zenith & Quasar Fabric and a distressed reverse french terry from Mily Mae. Mud Pie is in the current Marble Preorder at Zenith & Quasar.


I LOVE how this Nova turned out!


This Nova is so comfortable and cute and I am dying to wear it! The day I took these photos it was 100 degrees! As soon as it is cool enough, I am wearing this top!


The Nova Raglan is on sale for $7.99 through September 18th. While you are there - be sure to grab the Sunset Lounge Pants to pair with it. They are free and amazing - see my photo below! Use the code SINCLAIR to get them for free.


Follow me on Instagram and Facebook!

Disclosure: This post may contain affiliate links. These links provide me with a small compensation if you make a purchase using my link. There is not cost to you when you do this. My thoughts and opinions given in this blog post are mine.

5 out of 4 Patterns Michelle and Sheila

5 out of 4 Patterns has two new patterns that are great wardrobe basics - the Michelle Fitted Tee and the Sheila Everyday Tee and Dress. I really didn't think I would like Michelle as is is a fitted tee, but I think it actually makes me look thinner. However, I have been hesitant to actually wear my Michelle out of the house for fear that my belly is too obvious in it. I know - I should probably get over that irrational fear.


I have a laundry basket of fabric stashed under my sewing room table. This basket contains fabric that I had intended to destash before I moved and ended up using as packing material for my fragile items. I am honestly too lazy to destash and told myself to use that fabric for fit tests and when I'm not too sure I will like something I am testing.


This elephant print brushed poly came from that basket and I love this Michelle Tee so much! I love how it looks with these taupe distressed knit pants that I made recently. Now I just need to get over my insecurities and actually wear this outfit out of my house. It is so comfortable!


Here is Sheila! Sheila definitely has a more relaxed fit. I can throw my Sheila Tee on and not worry about those cookies that I ate for breakfast showing through.


I made this Sheila using a cotton/poly/spandex jersey from that basket under my sewing table. I was drawn to this funky print at a shop in the fabric district, but once I got it home, I wasn't too sure about the colors and it was a wonky cut remnant.


It was the perfect knit to use for the Sheila. Perfect weight and just the right amount of stretch and drape.


 Now that I sewed up this fabric, the print and color combination are interesting and my Sheila looks amazing with my taupe pants! I immediately wore this outfit one weekend when I had a bunch of shopping to do and was so comfortable.


So, which one do you like the most Michelle or Sheila? They are both currently on sale, so no need to pick just one. I love both and hope to make a few new ones for this fall. I will probably make a few Michelle's as layering pieces and a few Sheila's for casual wear. Both patterns are on sale through Sunday,  August 4th.

Follow me on Instagram and Facebook!

Disclosure: This post may contain affiliate links. These links provide me with a small compensation if you make a purchase using my link. There is not cost to you when you do this. My thoughts and opinions given in this blog post are mine.

Itch to Stitch Orono Top

I've had an obsession lately with crossover front tops.  So when Kennis at Itch to Stitch had a tester call for one, I immediately signed up. This is the Orono Top.


The Orono Top is perfect for all those knits with little stretch in your stash. I bought 6 yards of this gorgeous turquoise french terry from Golden D'or for 99 cents a yard during one of their Inventory Sales. Unfortunately it's been sitting in my stash a few years because it has only 10% stretch.


The Orono Top has pockets and the construction is very unique. I've never done a pocket this way, but I love it! I'll definitely try this technique on other tops.


The Orono Top is a raglan sleeve top, but the sleeves have a shoulder part that gives the sleeves perfect shaping for a more sophisticated fit.


The Orono Top features a tulip front and the back is slightly longer to create a high-low hemline.


I am 5' tall and did not remove any length from my Orono Top. I do love it this length on me, but think I will try it again with a few inches removed.


And like most patterns from Itch to Stitch, I couldn't stop at just one. I just had to make another.


For this one I used this dotted french terry from my stash. I bought is as a remnant from the fabric district about 8 years ago. It has only 10% stretch, so I've had a hard time finding a pattern to use it with. The Orono Top was perfect.


I used an organic cotton waffle knit for the sleeves. This thermal knit has about 25% stretch.


The french terry I used was thinner and had more drape than the turquoise french terry I used for my first Orono Top.


 And of course I had to include the pockets. The neckband includes a lengthen/shorten line to make it whatever height you want it.


Now that testing is over, I am going to modify the pattern a little bit to make a few for spring. The Orono Top is on sale for 20% off - making it $8 though Sunday, February 24th!

Follow me on Instagram and Facebook!

Disclosure: This post may contain affiliate links. These links provide me with a small compensation if you make a purchase using my link. There is not cost to you when you do this. My thoughts and opinions given in this blog post are mine.

Ellie & Mac Women's Lucky Girl Top

I love raglan style tops and the Ellie & Mac Women's Lucky Girl Top and Dress is no ordinary raglan.


The Lucky Girl has the cutest sleeves! I made the banded version, but there is also a version that ties.


Raglans are great for mixing and matching fabrics. I used a Texas fabric designed by Robyriker on Spoonflower. This print was offered by Sew Big Fabrics as a fundraiser for Hurricane Harvey victims. You can buy this print - and other coordinating Texas designs HERE.


Love how the Lucky Girl sleeve shows a little bit of skin.


I love that you can use scraps and short cuts for the sleeves on the Lucky Girl. The red I used above and below was a short cut of red cotton lycra from Made Whimsy.


This striped floral was in a short cut remnant pack I got from Wanderlust.


I think it's a fun combo. I might add some HTV to the front.


The Lucky Girl below was the final version and I made it with more scraps!


The cherry blossom design came from a destash and was a super wonky cut. I just barely got the body cut from it. It's  a good thing I'm short. I took 2" out of the length.


The brown was a cotton lycra remnant from Made Whimsy. Mandy periodically offers remnants and flawed pieces for just a few bucks for lots of usable fabric.


Grab the Lucky Girl for only $3.85 through Sunday (02/03).

Follow me on Instagram and Facebook!

Disclosure: This post may contain affiliate links. These links provide me with a small compensation if you make a purchase using my link. There is not cost to you when you do this. My thoughts and opinions given in this blog post are mine.

Greenstyle Creations Studio to Street Top

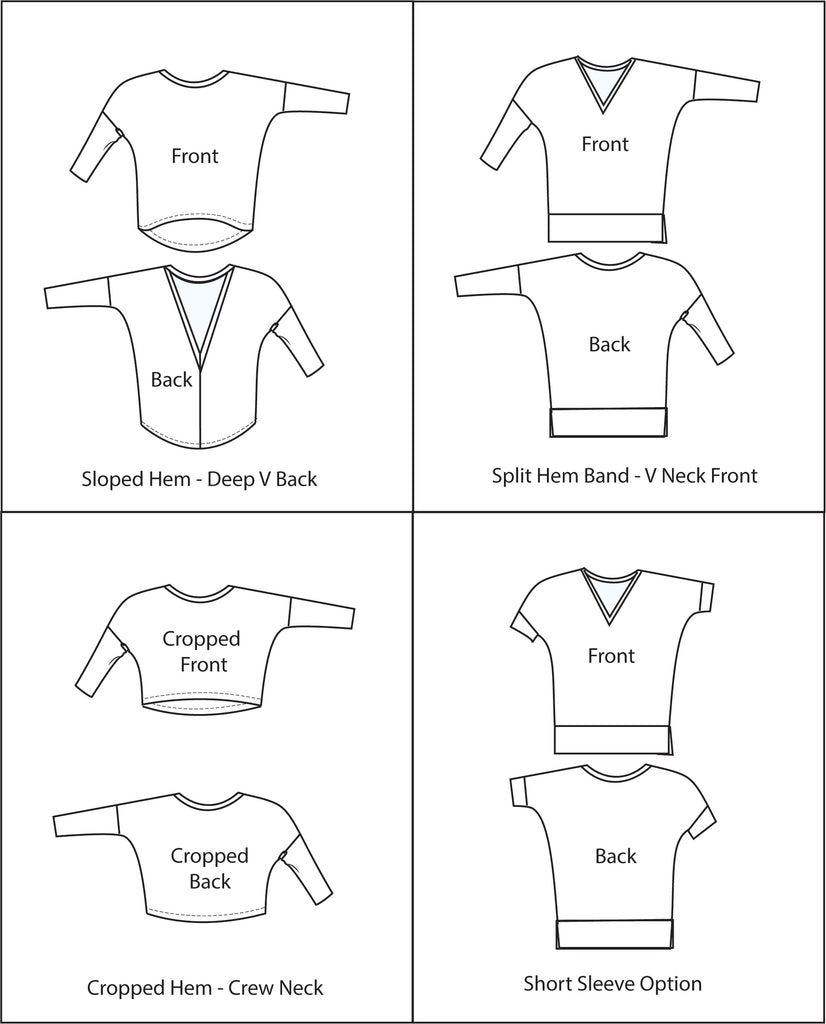
I love cute casual tops that I can wear for a weekend at home with jeans or leggings, and that looks equally good dressed up a bit. The Greenstyle Creations Studio to Street Top gives me that. It has so many options and I only tried one body style and 2 sleeves during testing. 


I love v-necks, but often don't make them because they take more time. To really get a great v-neck takes a few more steps and requires me to get away from my serger and on my sewing machine. One of my sewing resolutions this year was to take more time to give my makes more of the details I love that I have neglected to take the time to do.


So first up toward that goal was making this v-neck version of the Studio to Street Top. There's also a v back version with two different v's for two depths. I'll be trying that option soon.


I bought this cotton jersey fabric online a year or two ago and just loved the colors and the print. But it has so little stretch as it is 100% cotton. Thankfully the Studio to Street Top body is a dolman top that has a great loose fit and was perfect for using this fabric.


The sleeves of the Studio to Street Top are more fitted and really do need a fabric with more stretch. I used a cotton jersey rib knit for my sleeves and the neckband.


I absolutely love this top and have already worn it twice since testing.


I have found that I'm in need of more short sleeved tops. Almost every top I make, I tend to do 3/4 sleeves as I find I can wear that pretty much year round. But, I need short sleeves for when I go for allergy shots, infusion appointments, and pretty much anytime I'm visiting the doctor.


I made this short sleeved Studio to Street Top with a double brushed poly. I just love the vintage sewing machine print and have hoarded my 1 yard for a few years now.


Did you read that? I can make a Studio to Street Top with a yard of fabric - and you can too! I made a size small bust graded to XL hips. Yes, there is no doubt that I am a pear.


I also did not remove any length from the top for my height. This is the sloped hem version.


I can't wait to make a few more Studio to Street Tops. I need to try a few more of the options offered.


The Studio to Street Top is on sale for a limited time. Look at all the options below.

Studio to Street Top PDF Sewing Pattern XXS - 3XL


Follow me on Instagram and Facebook!

Disclosure: This post may contain affiliate links. These links provide me with a small compensation if you make a purchase using my link. There is not cost to you when you do this. My thoughts and opinions given in this blog post are mine.